
MIDI & OSC Integration
MIDI Learn for every visualizer control, Program Change preset switching, APC Mini MK2 LED feedback, MIDI clock, the OSC bridge, and controlling the Performer and its camera from TouchDesigner over OSC.
Audio Visualizers has MIDI integration in Performer mode — MIDI Learn for every visualizer slider, toggle and button plus the Performer's own live controls, preset switching from Program Change, native APC Mini MK2 support with LED feedback, MIDI clock, and MIDI CC as a modulation source — plus an OSC bridge whose messages MIDI Learn maps the same way.
Requirements
Web MIDI availability differs by browser. Chrome and Edge work directly, Firefox uses a one-time permission add-on, and Safari does not support it. See Browser Support for the current requirements.
Connect your MIDI device, then grant MIDI permission when prompted.
Performer Settings — the MIDI Home
All MIDI and OSC configuration lives in the Performer Settings modal. Open it by clicking the MIDI status indicator in the Performer control bar (or the settings button next to it). The modal has four tabs: MIDI, OSC, AUDIO, and DISPLAY.
MIDI Tab
- CONNECTED DEVICES — every detected MIDI input/output, with connection state. The list fills in as soon as the browser grants MIDI access and updates on its own when you plug in or unplug a controller.
- MIDI LEARN — START MIDI LEARN and the result of the last mapping, then LEARNED MAPPINGS. See MIDI Learn below.
- PROGRAM CHANGE — the Channel menu chooses which MIDI channel can switch Performer presets: ALL CHANNELS (default), CHANNEL 1–CHANNEL 16, or OFF. See Program Change below.
- NOTE MAP — notes choose presets: pick a Channel and a First note (F3 by default), and that note plays the first preset, each note above the next. See Note Map below.
- APC MINI MK2 — a live audio-level meter and the LED DISPLAY MODE picker (see below).
- MIDI Clock — choose INTERNAL (the app's own tempo) or EXTERNAL to follow a sequencer, drum machine or DAW sending MIDI clock. With EXTERNAL, its tempo becomes Performer's BPM (only LINK outranks it), MIDI Start plays the Scene Sequencer and MIDI Stop stops it, and the panel shows the tempo it is receiving. When the clock stops, the tempo goes back to the track, your taps or the live estimate.
OSC Tab
The OSC tab connects Audio Visualizers to an OSC bridge on your computer — the same bridge, on the same port, that OSC-1 and the laser tools use (see Which bridge to use):
- Run the bridge on the computer that runs BeamTracer
- In the OSC tab, enter the BRIDGE PORT (default
8765) and click CONNECT - The line under CONNECT reads Listening on ws://localhost:8765. once the bridge answers
- STATUS counts the messages received and shows the last address, so you can check your sender
- MIDI LEARN is the same panel as in the MIDI tab. MIDI Learn accepts OSC: click START MIDI LEARN, click a control, then move the fader or press the button in your OSC software instead of a knob. The mapping appears in the same LEARNED MAPPINGS list, for example OSC /1/fader1[0] → NEON ORB · SPHERE SEPARATION
The first value sets the range the control spans (0 to 1, −1 to 1, 0 to 127, or wider) and the range grows if your software sends past it; click the range on the row, such as AUTO 0–1, to type one. Only a value that moves is learned, so software that sends many addresses at once maps the one you move. Each control has one mapping, MIDI or OSC. See OSC messages.
AUDIO Tab
The same audio input settings as the main Settings modal — mic toggle, level meter, and input-device selection — so you don't have to leave Performer mode. See Audio Controls.
DISPLAY Tab
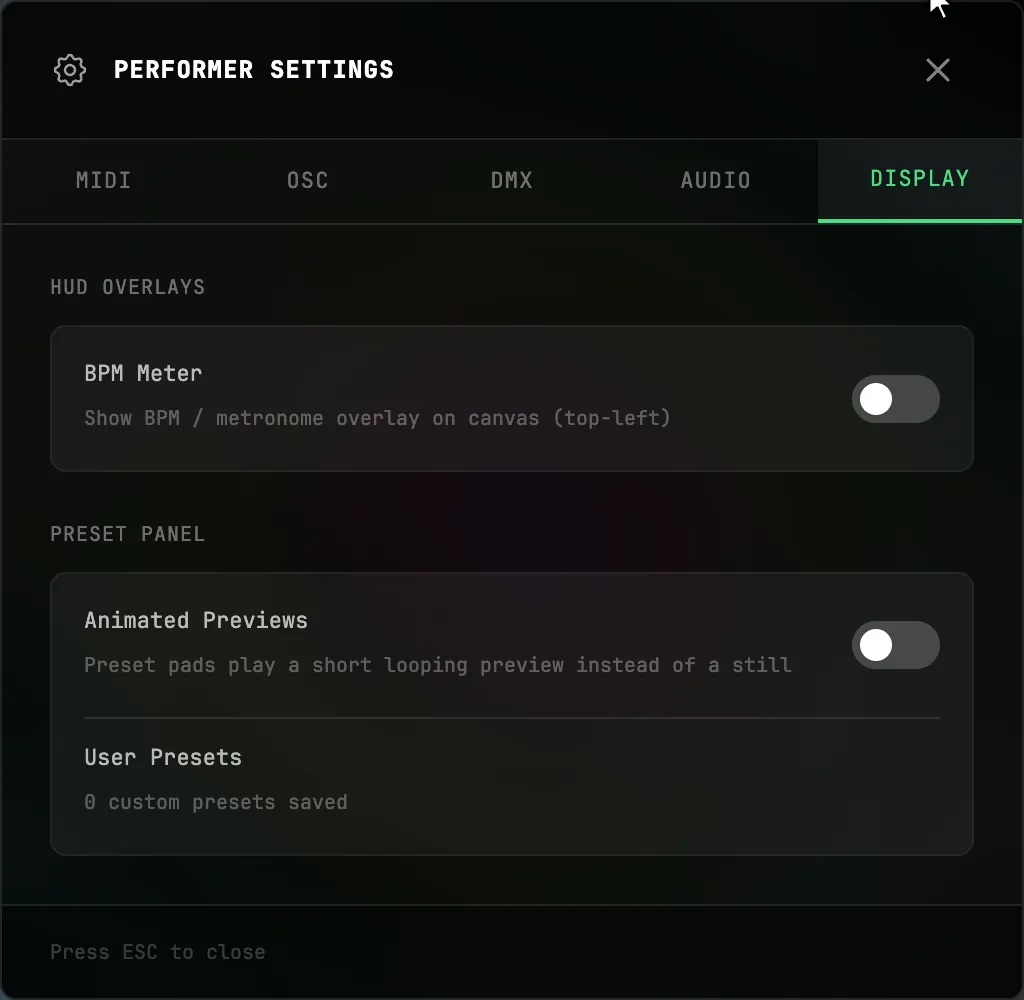
Performer display options, including the BPM Meter toggle that shows a compact metronome HUD in the top-left of the canvas.
How do I map a knob to a Performer control?
Open Performer Settings → MIDI and click START MIDI LEARN. Settings closes and a MIDI LEARN bar appears at the top of the screen:
- Open the visualizer's settings with the arrow toggle in the top-right. Every slider, toggle and button in it is outlined with a MIDI tag (expand a section to see its controls)
- Click the control you want. The bar says Move a knob, press a pad or send an OSC message for that control
- Turn a knob or fader, or press a pad or key. The bar names the new mapping, for example Mapped CC 21 ch 1 → NEON ORB · SPHERE SEPARATION
- Click the next control and repeat, or click DONE (or press Esc) to finish
Controls without a slider of their own are buttons in the bar: OUTPUT LEVEL (fades the whole picture), BLACKOUT, NEXT PRESET, PREVIOUS PRESET, TAP TEMPO and PRESET 1 to PRESET 16 (the first sixteen presets in the PRESETS panel's order, so each pad of a controller can call its own preset). The Scene Sequencer's transport has its own M buttons — see Scene Sequencer.
A mapped control shows its knob, such as CC 21 CH 1, above it in the settings panel.
How mapped controls behave
- Knobs and faders sweep a slider across its full range. A toggle is on while the fader is past halfway and off below it; a button such as NEXT PRESET fires each time the fader passes halfway.
- Pads and keys flip a toggle (BLACKOUT on, then off) and press a button once per hit. On a slider, a pad sets the value while held and returns it to the minimum on release.
- No jumps. After you drag the slider on screen or change preset, a knob waits until it reaches the slider's value, then takes over. Right after you learn a knob, it takes over straight away.
- A mapping belongs to one visualizer. A knob mapped to a Neon Orb slider drives Neon Orb, whether or not its settings are open. While another visualizer is showing, that mapping waits and is marked INACTIVE in the list.
- A mapped pad does only its mapped job. An APC Mini MK2 pad you learn to a control stops launching a preset, and a side button stops triggering a scene; the other pads keep their built-in jobs. Program Change is never learned and always switches presets.
- Learning a knob that is already mapped moves it to the new control, and the bar says which mapping it replaced. Each control has one knob, and each knob drives one control.
Can I use my computer keyboard?
Yes, in the Performer. Start MIDI Learn, click a control, then press a letter, number or symbol key, on its own or with Shift. The key then works like a pad: it presses a button, flips a switch, or holds a slider at its maximum while you hold the key. Learned keys show as KEY Q (or KEY SHIFT+Q) in the list.
Keys the app already uses can't be learned, and the learn bar says which shortcut owns the key (for example F, Performer fullscreen; , and ., previous and next preset; [ and ], previous and next visualizer; the number keys, which play FX looks). Esc, Tab, Enter, Space, the arrow keys, function keys and Ctrl, Cmd or Alt combinations are never learned. If a visualizer you switch to uses a key you learned, its own shortcut wins while it is showing. Typing in a text field never triggers a mapped key.
Can I trigger things with hand gestures?
Yes, in the Performer, with your camera on (or a video of someone's hands) under SOURCE in the FX Rack. Start MIDI Learn, click a control, then hold a gesture up to the camera for a moment: OPEN PALM, FIST, THUMB UP, THUMB DOWN, POINTING UP, VICTORY (index and middle finger) or I LOVE YOU (thumb, index and pinky). The gesture then works like a pad: making it presses the control once, the way a MIDI pad or a key does, and lowering your hand releases it, so a gesture can fire an effect's HIT, recall a look, step to the next preset or flip a switch. Learned gestures show as GESTURE OPEN PALM in the list. Either hand makes a gesture, and both hands making the same one still press it once. The hand tracking runs only while a gesture is mapped or being learned.
Learned mappings
LEARNED MAPPINGS in Performer Settings → MIDI lists every mapping as its knob and control. The trash button on a row removes that mapping. CLEAR ALL asks Remove all N mappings? in place, with REMOVE ALL and CANCEL.
On a paid plan, mappings are saved in your browser and come back on your next visit; if you have already allowed MIDI for the site, mapped knobs respond as soon as the Performer loads. On the Free plan, mappings last until you reload.
Control BeamTracer from TouchDesigner
To control the Performer from TouchDesigner, send OSC from an OSC Out CHOP to an OSC bridge on the same computer, and connect that bridge in Performer Settings → OSC. There are two ways to use the messages. You can send the fixed /beamtracer/viz/… addresses below, which need no setup. Or you can use MIDI Learn to map any address your patch already sends. Either way you can drive the visualizer's camera (orbit, elevation, zoom, pan, field of view and auto-rotate), switch presets, tap the tempo and black out the output.
How do I set up the OSC Out CHOP?
- Start an OSC bridge on the computer that runs BeamTracer. The bridge receives OSC on a network port and passes it to the browser; see Which bridge to use.
- In the Performer, open Performer Settings → OSC, enter the bridge's BRIDGE PORT (default
8765) and click CONNECT. The line under CONNECT reads Listening on ws://localhost:8765. - In TouchDesigner, add an OSC Out CHOP. Set Protocol to Messaging (UDP) and turn Active on.
- Set Network Address to the computer running the OSC bridge (
127.0.0.1when it is the same computer) and Network Port to the UDP port the bridge receives OSC on. - Leave Data Format at its default, so each channel is sent as its own message addressed by the channel's name. Rename each channel to the full address it should reach, for example
/beamtracer/viz/camera/orbit, with a Rename CHOP. Avoid Transpose By Name, which groups channels by their root name. - STATUS in the OSC tab counts the messages and shows the last address, so you can check that they arrive.
Which addresses can I send without learning?
These addresses work as soon as the bridge is connected. The FX Rack has its own addresses under /beamtracer/viz/fx/, listed on its page. Camera values are in real units, so use a Math CHOP to range your 0–1 channels (for example, 0–1 to −180–180 for orbit). A button acts on a message with no value, or on a value that rises to 0.5 or more. To press a button again, send a value below 0.5 first; a TouchDesigner Pulse does this for you.
| Address | Value | What it does |
|---|---|---|
/beamtracer/viz/camera/orbit | −180 to 180 | Degrees around the subject |
/beamtracer/viz/camera/elevation | −85 to 85 | Degrees above (+) or below (−) the subject |
/beamtracer/viz/camera/zoom | 0.25 to 4 | Times closer than the visualizer's own view (1 = its own view) |
/beamtracer/viz/camera/pan/x | −1 to 1 | Slides the view sideways |
/beamtracer/viz/camera/pan/y | −1 to 1 | Slides the view up and down |
/beamtracer/viz/camera/fov | 15 to 120 | Degrees of view |
/beamtracer/viz/camera/autorotate | −10 to 10 | Spin speed; 0 stops it, negative spins the other way |
/beamtracer/viz/camera/reset | none | Puts the camera back to the visualizer's own view |
/beamtracer/viz/preset/next | none | Next preset |
/beamtracer/viz/preset/previous | none | Previous preset |
/beamtracer/viz/visualizer/next | none | Next visualizer |
/beamtracer/viz/visualizer/previous | none | Previous visualizer |
/beamtracer/viz/preset/3 | none | The third preset in the PRESETS panel's current order (any number) |
/beamtracer/viz/blackout | 1 or 0 | Blackout on or off; a message with no value toggles it |
/beamtracer/viz/output/level | 0 to 1 | Output level |
/beamtracer/viz/tempo/tap | none | Tap tempo |
/beamtracer/viz/sequencer/play | none | Scene Sequencer play / stop |
The camera addresses move the orbit camera, the one you can drag with the mouse. They work on visualizers that have one, such as Audio Earth. On a flat visualizer, or on one that flies its own camera path, they do nothing. The addresses under /beamtracer/laser/ control the laser tools, not the Performer; see OSC blackout.
How do I map my own addresses instead?
- In Performer Settings → OSC (or → MIDI), click START MIDI LEARN.
- Click a control. The camera and Performer controls are buttons in the MIDI LEARN bar (CAMERA ORBIT, CAMERA ZOOM, NEXT PRESET …); visualizer controls are outlined in the visualizer's settings.
- Move the channel in TouchDesigner. Only a channel that changes is learned, so the others can keep streaming. The bar confirms, for example Mapped OSC /td/cam/orbit[0] → Camera Orbit.
- Click DONE.
A learned channel's range sets itself from what it sends: 0 to 1 spans the whole control. A Pulse CHOP mapped to NEXT PRESET steps one preset per pulse, and a channel held at 1 steps only once.
How do I stop the camera from jittering?
Camera controls glide to each new value rather than jumping, so tracking data from TouchDesigner or MediaPipe moves the view smoothly. CAMERA SMOOTHING, under LEARNED MAPPINGS in the MIDI LEARN panel, sets how much: OFF jumps straight to each value, and higher settings glide over a longer moment. It applies to every camera control, whether it is driven by a fixed address, a learned address or a MIDI knob. The visualizers' own camera sliders glide the same way.
How do I play Laser Show cues over OSC?
Laser Show has its own fixed addresses for playing its cues and its console like a lighting desk. Turn on OSC CUES in its MIDI & OSC section, which is on by default.
| Address | Value | What it does |
|---|---|---|
/beamtracer/viz/lasershow/cue | 1 or more | Plays that cue (1 = the first cue) |
/beamtracer/viz/lasershow/next | none | Next cue |
/beamtracer/viz/lasershow/previous | none | Previous cue |
/beamtracer/viz/lasershow/flash | 0 to 1 | Flashes the rig; no value flashes at full strength |
/beamtracer/viz/lasershow/strobe | 1 or 0 | Strobes while 1, stops at 0; a message with no value toggles it |
/beamtracer/viz/lasershow/freeze | 1 or 0 | Freezes all movement while 1, releases at 0; a message with no value toggles it |
Laser Show also plays from MIDI notes without learning: the base note plays cue 1 and each note above plays the next cue, while the note just below the base note flashes and the next two strobe and freeze while held.
APC Mini MK2 Deep Integration
The Akai APC Mini MK2 is natively supported with automatic LED feedback — no manual mapping needed. Connect it via USB and the integration activates when the device is detected.
Pad Grid = Preset Grid
The 8×8 pad matrix mirrors the preset grid:
- Each pad lights in its preset's color; the active preset is bright white
- Pressing a pad launches that preset
- Pad order follows the preset panel's current sort and filters — reorder your presets and the pads follow (Presets)
- Variant cycling: pressing the pad of the currently active visualizer type steps through that visualizer's preset variants
Opening the PRESETS panel automatically switches the LEDs to the preset grid.
LED Display Modes
When you're not using the pads as a preset grid, the LED matrix can double as a hardware meter. Pick a mode under LED DISPLAY MODE in the MIDI tab:
| Mode | LEDs Show |
|---|---|
| SPECTRUM | Real-time frequency spectrum across the 8 columns |
| STEREO VU | Left/right level meters |
| SPECTRUM VU | Combined spectrum + level view |
| PRESET GRID | The preset launcher (default while performing) |
Side Buttons & Faders
- The side-column buttons (MIDI notes 112–119) trigger the first 8 scenes in the Scene Sequencer
- The 9 faders send CC 48–55 (track faders) and CC 56 (master). They are unmapped by default — use START MIDI LEARN to bind them to any visualizer slider or to OUTPUT LEVEL
Program Change
Any controller or DAW that sends MIDI Program Change can switch Performer presets. Program 0 selects the first tile in the PRESETS panel, program 1 the second, and so on. A program number past the last tile selects the last one.
The order is the panel's current order: the sort button (ORIGINAL, A-Z, Z-A or CUSTOM) and any mood pill, family pill, Favorites or My Presets pill, or search you have applied. Until you open the PRESETS panel, the order is the original preset order. This is the same order the APC Mini MK2 pads follow.
Pick which channel is listened to under Performer Settings → MIDI → PROGRAM CHANGE → Channel. OFF ignores Program Change completely. The Performer connects to MIDI when you open Performer Settings or start MIDI Learn, so open it once after loading the page.
Note Map
NOTE MAP lets a sequencer, drum machine or keyboard cut between presets with notes, the way a clip track works on a hardware sequencer such as the OP-XY's MIDI track. Under Performer Settings → MIDI → NOTE MAP, pick a Channel (it starts OFF) and a First note. That note plays the first preset in the PRESETS panel's order and each note above it plays the next; the list beside it shows which note plays which preset for the first two octaves, with the current preset lit. Reordering the PRESETS panel renumbers the notes.
Sequence those notes on the beat and the presets cut with the music. A note you have learned to a control with MIDI Learn keeps doing that instead, and a note below the first note or past the last preset does nothing. For a pad per preset without a run of notes, learn pads to PRESET 1 to PRESET 16.
Showcase Mapping
Performer Settings → MIDI → SHOWCASE MAPPING loads one controller layout for the five looks made for a sequencer or drum machine (DATA HANDS, PINCH SWEEP, THERMAL BODY, SPARK DRUMS and KICK FLIP). Pick the Channel your sequencer sends on and press LOAD. It is laid out for an OP-XY's MIDI track, whose eight CCs can change on every step, and works with any controller:
| Send | Does |
|---|---|
| Notes C6 to E6 | Recall DATA HANDS, PINCH SWEEP, THERMAL BODY, SPARK DRUMS, KICK FLIP |
| Note 36 (kick) | TRACK HIT |
| Note 38 (snare) | EMIT HIT |
| Note 42 (closed hat) | PIXELATE HIT |
| Note 46 (open hat) | KALEIDO HIT |
| CC 1 | Pixelate block size |
| CC 2 | Feedback persistence |
| CC 3 | Kaleido segments |
| CC 4 | Thermal mix |
| CC 5 | Emit rate |
| CC 6 | Track intensity |
| CC 7 | RGB shift amount |
| CC 8 | Emit spread |
The mapping is added to what you have already learned; a control you mapped to one of those notes or CCs on that channel moves to the showcase. The CCs set each value directly, so a step that changes a CC lands on that value at once. Each mapping then shows under LEARNED MAPPINGS, where you can remove it or learn something else in its place.
Other Controllers
Any class-compliant MIDI controller works with MIDI Learn, Program Change and MIDI clock.
- Knobs and notes as modulation sources. Common controllers (mod wheel, volume, expression, sustain and a few more) also appear in the MIDI CC group of a slider's modulation source list, where a knob modulates a slider around its set value instead of setting it. Note velocity and Note pitch follow the last note you played, so a drum track's accents can make EMIT's sparks bigger and faster. See Modulation Matrix.
- Scene Sequencer transport. Play/Stop, Loop, Shuffle and BPM sync each have an M button; see Scene Sequencer.