
Laser DAC Output
Connect a laser DAC and drive real hardware — device selection, arming, power, point rate and color delay, shared by every BeamTracer app that outputs to a laser.
Every BeamTracer app that can drive a laser uses the same Laser Output panel: OSC-1, Text to Laser, Image to Laser, Video to Laser, AI Beam Creator, Animation Studio, and the ILDA Viewer. The controls, the safety behavior, and the settings you calibrate are identical everywhere — set your projector up once and every tool respects it.
This page is the detailed reference for that panel. Each app's own page covers what it sends to the laser; this covers the output itself.
Tier: output to real hardware is a Studio feature. Every account gets 3 free output sessions to try it, and the DAC Simulator is free on every tier, so you can build and test without hardware or a subscription. See Pricing.
Laser hardware projects real laser beams. Follow laser safety guidelines before operating — see Laser Safety. Software cannot make audience scanning safe.
Supported hardware
| DAC | Connection | Extra software |
|---|---|---|
| Helios | Direct USB, over WebUSB | None — the browser talks to it |
| DAC Simulator | No hardware needed; free on every tier | None |
| Ether Dream | Local network | BeamTracer Bridge |
| LaserCube | Local network (Ethernet verified) | BeamTracer Bridge |
| IDN receiver (ILDA Digital Network) | Local network | BeamTracer Bridge |
BeamTracer is an Amazon Associate and may earn from qualifying purchases via links on this page.
A Helios needs no extra software. Plug it in, open a BeamTracer app in Chrome or Edge, pick it in the DEVICE zone, and you are driving real hardware — no drivers, no Bridge, no download. Output to hardware still needs an account and the tier above, but nothing gets installed on your machine.
Ether Dream, LaserCube and IDN receivers are reached over the network, which a browser cannot do on its own, so those need the free BeamTracer Bridge running on the same computer.
Use Chrome or Edge on the secure BeamTracer site. Direct Helios output needs WebUSB, which no other browser implements — see Browser Compatibility.
The panel
The Laser Output panel always presents the same zones in the same order:
- DEVICE — pick the target, connect, and see what is attached
- OUTPUT — the controls you reach for most: point rate, power, and the per-app framing controls
- ADVANCED — set-once calibration and MIDI LEARN, collapsed by default
- SAFETY — ARM, status, BLACKOUT and START
A control that does not apply to the app you are in is not shown, rather than shown grayed out.
Connecting
Helios (recommended)
- Plug the Helios in over USB.
- Select HELIOS in the DEVICE zone, then click CONNECT HELIOS.
- The browser shows its own USB picker listing Helios devices. Choose one and connect.
The device card then shows the DAC's name, its state, and its maximum point rate.
Reconnecting always needs a fresh CONNECT HELIOS and another trip through the browser picker. That is a browser rule, not a BeamTracer one: the Helios reports no USB serial number, and a browser can only remember permission for a device that has one. It cannot even tell the page the DAC came back. DACs that do report a serial number are unaffected.
DAC Simulator
A virtual DAC that renders the exact point stream — blanking included — to an on-screen preview. Free on every tier, and it never consumes a trial session. Use it to verify content before any real beam.
Pick SIMULATOR in the DEVICE zone and press CONNECT SIMULATOR. It is offered in OSC-1, Text to Laser, Image to Laser, AI Beam Creator, Animation Studio and the ILDA Viewer. With the Simulator you can ARM and START exactly as with a projector, so the output preview, the motion guard and its notice all run with no hardware attached.
Output preview
Connect a device and a preview appears in the panel's MODULE section — MODULE · SCOPE in OSC-1, MODULE · SCANNER in Text→Laser and Video→Laser. It draws the same point array the DAC receives.
When it starts drawing differs by app, because the two build frames differently:
- OSC-1 previews as soon as a device is connected, Simulator included — you do not have to arm anything. While nothing is armed it is labeled PREVIEW · NO OUTPUT. OSC-1 sends the laser the same XY samples the scope draws, in real time: frames are consecutive slices of that signal, not a re-traced copy of the figure, so a circle closes on the wall the way it closes on screen. If a slice reaches the Bridge late, the beam holds dark for a moment rather than repeating the previous one.
- The other laser tools preview while output is running, since they only build a frame once armed and started. Connect the Simulator, ARM and START to watch it without hardware.
Under the preview are the same scanner controls as the ILDA Viewer's galvo simulation and Video to Laser's Live previews. They are one setting, so a choice made here follows you everywhere:
- SCAN RATE — the point rate the preview draws at.
- TRAIL — how much of the previous light stays on screen (0% for none).
- PREVIEW SPEED — slows the scan down, as far as 0.01×, so you can watch the beam travel. It never changes what the laser receives.
- MIRRORS — IDEAL (the default) draws the figure exactly as sent, with no scanner limits. PHYSICS shows an estimate of what real mirrors draw at the scanner class you pick under SCANNER. Look for rounded corners, overshoot, and brightness changes. A beam that holds still shows as a bright dot, the longer it dwells the brighter, and disappears when the motion guard blanks it.
- SCAN ANGLE — with PHYSICS on, the optical angle your projector draws the full figure at (5° to 60°, default 40°). A narrower angle is easier on the mirrors.
The preview's corner label shows IDEAL, or PHYSICS with the scanner class. PHYSICS is a comparison aid; verify the result on your own equipment.
The four scanner classes, fastest first:
| Class | Models |
|---|---|
PREMIUM 60K | ILDA 60K sets — Saturn 5 class |
STANDARD 40K | A competent ILDA 40K set |
STANDARD 30K | ILDA 30K — Saturn 9 / CTI 6215 class |
BUDGET 40K | A 40K rating on a cheap part — DT-40 class |
STANDARD 40K and BUDGET 40K are not the same scanner. They share a number on the box and behave very differently: the budget class has lower bandwidth, looser damping and a torsional resonance, so it goes wavy under hard drive where the standard class stays clean. If your projector is rated 40 kpps, start at STANDARD 40K and only drop to BUDGET 40K if the sim looks better than your wall.
Ratings are also quoted at different test angles, and a narrower angle flatters the number — 35 kpps at 7° is a slower scanner than 40 kpps at 8°, despite looking close. Which is the real reason to trust your own projection over the spec sheet.
Under the controls:
- Points/chunk in OSC-1 — the number of consecutive XY samples in each output slice. Chunks sent counts those slices; it is not the drawing's refresh rate. Other laser tools show Points/frame for their frame-based output.
- Tracking error — the overall tracking error across lit points, as a percentage of the scan field.
- Peak lit error — the largest error at one lit point, including the start of a stroke after blanked travel. A brief stroke-start error can dominate this number even when the rest of the drawing tracks closely. Read it alongside Tracking error and the preview; it does not rate your scanner.
The expand icon in the corner opens the preview full-screen, which is the view to use when comparing it against an actual projection.
Compare PHYSICS with IDEAL before output. Large differences can help identify demanding corners or travel between strokes. Simplify the artwork or adjust settings within your projector's specified limits, then verify the physical result.
Ether Dream, LaserCube and IDN
All three connect through the BeamTracer Bridge running on the same computer. Click OPEN BEAMTRACER in the Bridge's menu-bar panel, or type its four-digit PAIRING CODE where the panel asks for it, then choose the DAC. Pairing is a one-time step.
- Ether Dream — keep the DAC and computer on the same local network.
- IDN — any ILDA Digital Network receiver on the local network, such as an OpenIDN server or an IDN-capable projector. Pick IDN in the DEVICE zone; the Bridge scans for receivers when the list opens and again when you press CONNECT, and every receiver it finds is listed with its address so you choose the unit.
- LaserCube — put the cube in Control Mode → LaserOS with LAN client and quit LaserOS everywhere, then pick it here. Cube settings, color thresholds, point rate, firmware and what the cube does when the stream stops are on the LaserCube page.
Naming a projector
Some DACs store a name you can set. When the connected hardware supports it, a pencil appears beside the device name — click it, type a name like FRONT or REAR, and it is written to the DAC itself. The name follows that physical unit to any computer, which is how you tell two otherwise identical projectors apart.
Arming and firing
When a physical DAC connects, a safety dock appears along the bottom edge of the app: a POWER slider at the left, then device status, ARM, BLACKOUT and START. The dock sits outside every panel and column, so no collapse, scroll, or fullscreen can hide it, and it is in the same place in every app.
- ARM — click, then confirm. Arming never fires the beam on its own.
- START — begins output. STOP ends it.
- BLACKOUT (or
Esc) — requests output to stop and holds it off until you release it. Keep the projector's physical interlock available. See keyboard control.
The Simulator keeps its controls inside the panel. If the dock is on screen, a real laser is attached.
Arming is always a browser action — the BeamTracer Bridge never arms output on your behalf. Its BLACKOUT stops only outputs connected through the Bridge; those outputs also go dark on disconnect, sleep and quit. A DAC connected directly to the browser over USB is unaffected: stop it in BeamTracer or use the device's physical controls. RELEASE in the Bridge permits output again, but you must ARM and START in BeamTracer to resume.
Your projector stays connected while you rearrange the workspace — collapsing a column, entering fullscreen, or switching a tool's working mode does not end the session. If the USB cable is pulled, output stops, the panel disarms itself, and the reason appears above the safety row.
How do I black out the laser from the keyboard?
Press Esc. While a laser is connected — a projector, or the DAC Simulator — Esc does exactly what the BLACKOUT button does, in every laser tool: output stops and stays off until you click RELEASE BLACKOUT, and then you press START again. Pressing Esc a second time keeps the blackout on; nothing on the keyboard releases it.
Esc blacks out even while you are typing in a text field, while a dialog or settings panel is open (the dialog still closes), and while MIDI LEARN is running (learning stops too).
| Shortcut | Button | What it does |
|---|---|---|
Esc | BLACKOUT | Stops output and holds it off |
Ctrl+B (⌘B on Mac) | BLACKOUT | Same as Esc |
Ctrl+A (⌘A on Mac) | ARM | Same as clicking ARM — press twice to arm (request, then confirm), once more to disarm |
Ctrl+S (⌘S on Mac) | START | Starts output, only when START is available: armed, connected and not blacked out |
- The buttons show their keys whenever the keys work:
⌘Aon ARM,Escon BLACKOUT (plus⌘Bin the safety dock) and⌘Son START. With no laser connected the keys do nothing and keep their usual meaning. ⌘Aand⌘Sdo nothing while you are typing in a text field or a dialog is open, so⌘Astill selects text there. Holding⌘Adown does not arm: each press must be separate.⌘Sonly ever starts output — it never stops it. While output is not ready to start,⌘Skeeps its usual meaning; in OSC-1 that is Save project, so while a laser is armed and ready, save from the projects library instead.- In fullscreen, Chrome and Edge normally keep
Escfor leaving fullscreen. While a laser is connected, a quickEscpress blacks out instead; press and holdEsc, or pressCtrl+F(⌘Fon Mac), to leave fullscreen. In the Laser Studio tools a quickEscalso leaves fullscreen after blacking out. - In Video to Laser Live,
Escblacks out the laser, Laser B and the Second Screen window, and it works in Live even before a projector is connected.
Keyboard shortcuts only reach the browser tab that has focus. They are not an emergency stop: keep the projector's physical interlock within reach.
How do I black out the laser from a MIDI controller?
Map a pad or fader to LASER BLACKOUT and it takes the laser off exactly like the BLACKOUT button. MIDI can only turn a laser off: there is no MIDI control for ARM, START, or power.
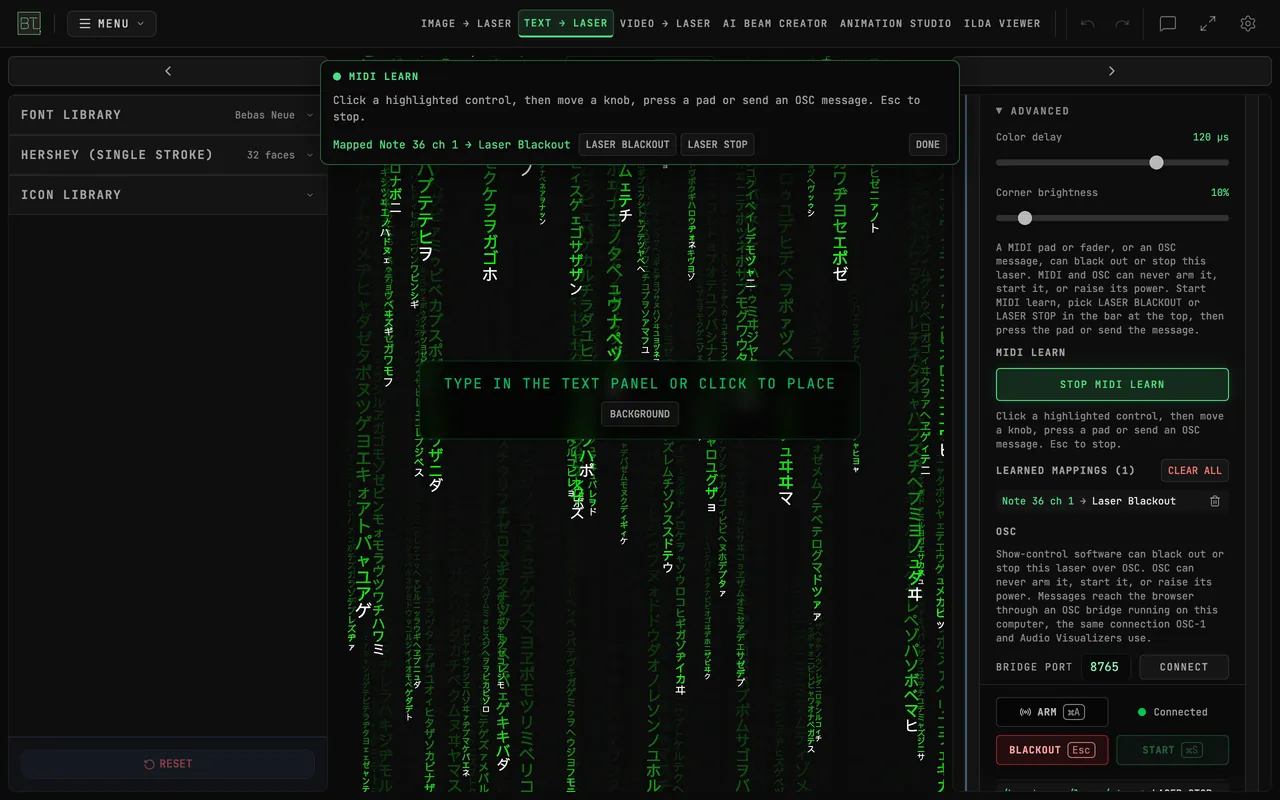
- Connect your controller over USB, then open a laser tool in Chrome or Edge.
- In the Laser Output panel, open ADVANCED and click START MIDI LEARN under MIDI LEARN. In OSC-1, use Settings → MIDI → START MIDI LEARN instead.
- The MIDI LEARN bar at the top of the window shows LASER BLACKOUT and LASER STOP. Click one, then press a pad or push a fader. The bar confirms it, for example Mapped Note 36 ch 1 → Laser Blackout.
- Click DONE or press Esc. The mapping is listed under LEARNED MAPPINGS, with a button to remove it.
What the mapped controls do:
- LASER BLACKOUT — a pad press, or a fader pushed past halfway, stops output and holds it off, the same as BLACKOUT. Letting go of the pad changes nothing, and pressing it again keeps the blackout on. To resume, click RELEASE BLACKOUT on screen, then START.
- LASER STOP — stops output without holding it off, the same as STOP. Press START on screen to resume.
- In Video to Laser, while Laser B is added, LASER B BLACKOUT and LASER B STOP act on Laser B alone. LASER BLACKOUT stops both lasers.
- One mapping works in every laser tool: Text to Laser, Image to Laser, Video to Laser, AI Beam Creator, Animation Studio and the ILDA Viewer. OSC-1 keeps its own mappings.
- The pad works before a projector is connected too. A blackout set then keeps START unavailable until you release it.
- A pad mapped to LASER BLACKOUT does only that. On an APC Mini MK2 in OSC-1, it stops doing its built-in job.
- MIDI Learn also maps an OSC message instead of a pad: click LASER BLACKOUT in the bar, then send the message from your show-control software. The list shows it as, for example, OSC /show/panic[0] → Laser Blackout. It acts on a message with no value, or when the value rises into the top half. Like a pad, it can only turn the laser off. The fixed OSC addresses work without learning.
- On a paid plan, mappings are saved in your browser; on the Free plan they last until you reload. See Saving mappings.
A MIDI blackout depends on the controller, its cable and the browser tab, so it is not an emergency stop. Press the mapped pad once before every show to confirm it blacks out, and keep the projector's physical interlock within reach.
How do I black out the laser over OSC?
Send the OSC message /beamtracer/laser/blackout from show-control software such as QLab or TouchOSC, and the laser goes off exactly as if you had pressed BLACKOUT. OSC can only turn a laser off: no OSC message arms a laser, starts it, or changes its power. The addresses are fixed, so there is nothing to learn, and one cue works in every laser tool.
| Address | Does the same as |
|---|---|
/beamtracer/laser/blackout | BLACKOUT |
/beamtracer/laser/stop | STOP |
/beamtracer/laser/b/blackout | BLACKOUT for Laser B only (Video to Laser, while Laser B is added) |
/beamtracer/laser/b/stop | STOP for Laser B only |
Use a compatible OSC bridge on the same computer as BeamTracer. Open the app’s OSC settings, enter BRIDGE PORT, click CONNECT, and check the connection indicator before sending messages from your show-control software. The same bridge can serve the laser tools, OSC-1, and Audio Visualizers.
Compatibility: choose a bridge that relays standard OSC messages unchanged. A relay that converts messages into a different text format will not work. See MIDI Integration for the visible OSC connection controls.
- Start your OSC bridge on the computer that runs BeamTracer.
- In a laser tool, open the Laser Output panel's ADVANCED section. Under OSC, enter the bridge's BRIDGE PORT (the default is
8765) and click CONNECT. OSC-1 has the same BRIDGE PORT and CONNECT in Settings → OSC, where the Laser Blackout block lists the same two addresses; Audio Visualizers has them in Performer Settings → OSC. - Check the line under CONNECT. It reads Listening on ws://localhost:8765. once the bridge answers. While it reads Not connected or No OSC bridge answering … retrying, OSC cannot black out the laser.
- Send
/beamtracer/laser/blackoutto the bridge from your show-control software. For example:- QLab: a Network cue that sends
/beamtracer/laser/blackoutwith no arguments to the bridge. - TouchOSC: a button with the address
/beamtracer/laser/blackout. The button sends 1 when you press it and 0 when you let go; the press blacks out and the release does nothing.
- QLab: a Network cue that sends
What the messages do:
- A message with no value,
true, or a number of 0.5 or more counts as a press. A number below 0.5, orfalse, is ignored, so letting go of a button never relights anything. /beamtracer/laser/blackoutstops output and holds it off. Sending it again, or many times over, keeps the blackout on. To resume, click RELEASE BLACKOUT on screen, then START./beamtracer/laser/stopstops output without holding it off. Press START on screen to resume.- In Video to Laser,
/beamtracer/laser/blackoutstops both lasers; the/b/addresses act on Laser B alone. - The messages work before a projector is connected too. A blackout set then keeps START unavailable until you release it.
- Any other address under
/beamtracer/laser/does nothing. These addresses are reserved: MIDI Learn never maps them to a control, in any app. - If the bridge stops, the laser keeps doing what it was doing; only the OSC blackout stops working until the bridge is back. Every app reconnects on its own when the bridge returns.
- After you reload the page, connect the bridge again.
An OSC blackout travels through your network, the bridge and the browser tab, and a message can be lost on the way, so it is not an emergency stop. Send the cue once before every show to confirm it blacks out, and keep the projector's physical interlock within reach. Anything that can send OSC to your bridge can black out the laser, but nothing sent over OSC can turn it on.
Output controls
- Point rate / Scanner — output rate in points per second. Match it to your scanner's rating; 30k is the common default.
- Power limit — the master output ceiling, 0–100%. It is never folded into Advanced, and the dock's POWER slider drives the same value. One ceiling is shared by every laser tool and remembered across reloads, so a rig dialed to 10% cannot silently come back at full power.
- Frame rate — how often a frame-based drawing is redrawn. Lower allows more points per frame; higher can reduce flicker. OSC-1 sends a continuous XY signal and has no drawing frame-rate control: use Point rate to set how quickly its samples reach the scanner.
- Galvo speed — how hard the mirrors are driven, as a percentage of the tuned default. Lower is gentler on modest scanners and softens the drawing; higher is crisper on premium scanners but can bow corners on cheap ones.
- Output scale — how much of the full scan field the image fills, from 25% to 100%. It starts at 100%, except in OSC-1, which starts at 80% so a full-size figure keeps room at the edges. Use it to size the projection for the room. One setting is shared by every laser tool, OSC-1 and both lasers in Video to Laser, and it is remembered across reloads: once you move it in any tool, every tool uses that value, so switching tools never changes the size on the wall. If a figure that fills the field shows notches, lower it: points pushed past the edge of the field are blanked.
- Motion guard — holds back output that would park a stationary beam. A dot that stays in place starts to fade after about 1.5 seconds and is dark by about 2 seconds; output relights as soon as it moves. Every laser tool applies it and says so while it holds the laser dark, in amber under ARM in the panel or in the safety dock: Beam blanked: signal idle in OSC-1 (When the signal stops), and Beam blanked: output not moving in every other tool. Hover it for the reason. The drawing on screen is unchanged; only the laser is held back.
Which of these appear depends on the app — a tool that draws frames shows framing controls that a live audio scope does not.
Advanced calibration
- Color delay — shifts color against scanner position so colors line up at corners, since galvos lag color modulation. If strokes start dark or faint lines connect your shapes, this is the control — see Color Delay Explained for what each symptom looks like and how to dial it in. It starts at the measured +120 µs default and is remembered per DAC, so each projector keeps its own value. Raise it until blanked jumps stop drawing faint lines between shapes; go negative if color switches early.
- Color calibration — per-channel output curves for red, green and blue, with five draggable points from 0% to 100% input. Use it to lift a diode's turn-on threshold or tame a hot channel. True black always stays black. Reset Curves returns every channel to identity.
First light checklist
- In OSC-1, connect the DAC Simulator first and confirm the preview matches what you expect.
- Set MIRRORS to PHYSICS and pick your scanner class under SCANNER. Resolve obvious problems in the preview before operating hardware.
- Follow your projector's instructions and the Laser Safety guidance. Confirm the projection area, physical interlock, scan limits, and power limit before connecting the real DAC.
- ARM, then START with simple content only when the physical setup is ready. Keep STOP and the physical interlock within reach.
- Stop output before adjusting the setup. A low software power percentage or a clean-looking preview does not establish eye safety.
Troubleshooting
- The browser cannot reach the Bridge — it must run on the same computer as the browser, and Chrome may ask for local network access the first time.
- BeamTracer asks for the pairing code again — this browser was removed under Settings → Pairing in the Bridge, or every pairing was reset. Click OPEN BEAMTRACER in the Bridge or type the current code.
- Scanners move but nothing appears on the wall — check the projector's own interlock, key and shutter before changing any software setting.
- Corners look soft or overshoot — lower the point rate or the galvo speed; both reduce how hard the mirrors are driven. Set the preview's MIRRORS to PHYSICS first: if it reproduces what you are seeing, the scanners are the limit and the setting to change is the rate, not the artwork.
- The projection looks nothing like the canvas — stop output, then compare IDEAL against PHYSICS in the preview. Check your projector's orientation and calibration, the selected scanner class, and the point rate before testing again.