
Animation Studio
A complete guide to BeamTracer's timeline-based laser animation builder — layers, keyframes, shape morphing, motion paths, audio-reactive parameters, and ILDA export.
Animation Studio is a full-featured timeline editor for building laser animations. Compose layers, animate properties with keyframes, sync to audio, and export complete ILDA animation sequences.
Your layers, keyframes, and timeline settings are auto-saved in this browser. Work survives closing the tab, but it does not sync to another browser or device. Clearing site data removes the saved session. Autosave does not replace your DEVICE choice or custom points-per-second limit; those remain tied to the projector profile you selected.
Interface Layout
Assets Sidebar
Left panel, in three sections: SOURCE (a drop zone for SVG and Lottie files, a one-click BEAM word sample, and the LOTTIE STAR and LOTTIE BALL examples), QUICK TOOLS, and ICON LIBRARY search. Click a tool, then click the canvas to place it.
Canvas
Center. The live preview of your current frame, with optional rulers, guides, and grid. All editing happens here — drag, transform, and position layers. An empty session shows an ambient screensaver until you add your first layer.
Properties Panel
Right panel, with four tabs: PROPERTIES (layer settings, transform origin, timeline settings), ANIMATION (morph, modifiers, keyframes, onion skin), SAFETY (the safety report and the ILDA FILES section), and AUDIO (the audio chain).
Timeline
Bottom, once the canvas has content. Layer rows and keyframe tracks. Click to move the playhead, drag keyframes to retime.
Ctrl+[ toggles the left panel, Ctrl+] the right, and Ctrl+\ both — handy for a bigger canvas.
Layer Types
Every element in your animation is a layer. Layers stack and can be independently animated.
- SVG layer — Import any SVG file up to 10 MB (or drag-and-drop onto the canvas)
- Lottie layer — Import a Lottie vector animation (
.jsonor.lottie, up to 10 MB). It plays its own animation on the timeline; see How do I import a Lottie animation? - Text layer — Live text with a choice of 5 fonts: Bebas Neue, Roboto, Pacifico, Inter, or Arial. Double-click a text layer on the canvas to edit it in place — an inline caret appears and the on-canvas preview matches the exported laser output exactly (same font, size, and position)
- Icon layers — search the ICON LIBRARY by name. An imported icon becomes an ordinary SVG layer, so tracing, Split to Paths, and Merge all apply to it
- Quick tool layers — drawn or generated directly from the QUICK TOOLS grid: Circle, Square, Triangle, Line, Sine Wave, Triangle Wave, Bezier, Freehand, Lissajous, Spirograph, and Oscilloscope (the grid also holds the Text Layer tool)
The generator tools have deep parameter panels: Sine Wave (32–256 points), Lissajous (frequency ratios and phase), Spirograph (hypotrochoid/epitrochoid curves with a 200–2000 point resolution slider), and Oscilloscope, which opens its own OSCILLOSCOPE → LAYER converter: it turns a stereo XY WAV (left channel is X, right is Y) into laser geometry and adds it as a layer, which is a different job from the AUDIO tab and does not react to music — see the Oscilloscope Music to ILDA recipe.
Oscilloscope and Lissajous Stereo layers preserve decoded XY samples. The converter shows XY Point Rate and groups samples at 30 FPS or 60 FPS. Position, size, and rotation are supported; unsupported modifiers and overlapping XY/vector exports show an error. Continuous XY hardware output is currently unavailable in Animation Studio. ILDA export adds beam-off travel and dwell points, so it does not guarantee the original audio timing. See Oscilloscope Music for the limits and workflow.
To draw a Line, switch the editor to Edit, choose Line in QUICK TOOLS, and drag from its center toward an endpoint. The line extends equally in the opposite direction. Drag vertically, horizontally, or diagonally; use Rotate to adjust its direction afterward. With snapping enabled, the starting center follows the grid.
Sessions are limited to 10 layers. Adding a new layer at the limit is blocked until you remove one, and a multi-layer preset adds only as many layers as still fit. Lasers redraw every layer each frame, so fewer, cleaner layers also scan better — see Scanner Load.
Multi-Layer Generator Presets
The Spirograph and Lissajous panels include multi-layer preset pickers that build a complete animated composition from the current layer (the new layers count against the 10-layer limit, and the source layer is kept but hidden):
- Spirograph: Rainbow Center, Triangle Breathe, Draw Cascade, Audio Spectrum, Morph Dance — see Spirograph
- Lissajous: Harmonic Morph, Phase Dance, Draw Cascade, Breathing — see Lissajous
Layer Management
Each timeline layer row carries its own controls — lock, show/hide, clone, sound assignment (when sounds are loaded), and delete — and rows can be dragged up or down by the grip handle to reorder layers.
- Clone — duplicate a layer with all its settings, including the audio reactions scoped to it.
Cmd+Clickthe clone button to clone in place - Multi-select —
Cmd/Ctrl+Clicklayers to select several at once for merging - Split to Paths — break an SVG layer into one layer per path, so each path can be animated independently (great for logos — see the Audio-Reactive Logo recipe). Each part keeps its own colors, strokes and position. The source layer is kept, hidden, marked "(original)". A session holds 10 layers: when the paths would not fit, the first paths get a layer each, every remaining path shares the last one, the original is removed to make room (undo brings it back), and a note under LAYER TOOLS says how many were merged
- Merge Layers — MERGE N LAYERS combines the selected SVG layers back into one. The merged layer keeps every audio reaction that drove its parts, so an audio-reactive logo stays reactive after a merge
- LOCK SHAPE / UNLOCK SHAPE — protect a layer from accidental edits
When an SVG or Lottie layer is selected, its TRACE section uses the same SIMPLIFY range as Image to Laser: 0.5–6.0, default 2.0. Raise it to remove redundant samples or lower it for a detailed curve. SMOOTH CURVES offers OFF, NORMAL, and STRONG without rounding straight edges or right-angle corners. Locked layers keep both controls disabled.
How do I import a Lottie animation?
Drop a Lottie .json or .lottie file on the SOURCE drop zone (or onto the canvas), or click LOTTIE STAR or LOTTIE BALL in SOURCE to try a built-in example. The animation becomes a Lottie layer: its shapes are traced as laser lines, it plays on the timeline at the file's own frame rate, and it exports with DOWNLOAD ILDA like any other layer.
- Drop a
.jsonor.lottiefile on SOURCE (or click LOTTIE STAR). - Press Play in the TIMELINE. The layer starts on its first frame at the layer's start time and loops for as long as the layer lasts. If the animation is longer than the timeline, the timeline is lengthened to fit one full loop.
- Select the layer and open LOTTIE in PROPERTIES to see its frame count and frame rate, and anything in the file that is not drawn.
- Adjust TRACE (SIMPLIFY and SMOOTH CURVES) as for an SVG layer. The layer draws in the file's own colors; to use one color instead, pick it in COLOR (see Does a Lottie layer keep the file's colors?).
- Export with DOWNLOAD ILDA, or check the result first with OPEN IN ILDA VIEWER →.
Position, size, rotation, keyframes, motion paths, modifiers and audio reactions work on a Lottie layer as on any other layer, and every exported frame stays within the same point limit and safety checks. A saved project keeps the animation.
What is drawn: shape layers — paths, rectangles (including rounded corners), ellipses, stars and polygons — with their groups, precompositions and parent layers; animated position (including curved motion paths), scale, rotation and anchor point; trim paths; and repeaters. Filled shapes are traced around their edge, because a laser draws lines. Layers set to 0% opacity, hidden layers and layers outside their in and out points are not drawn.
What is not drawn: image, text and solid layers, effects, masks, track mattes, expressions (the keyframed value is used), time remapping, skew, and the round corners, merge paths, offset paths, pucker and bloat, twist and zig zag shape effects. The LOTTIE panel names any of these that your file uses. A .lottie file plays its first animation. Up to 1,800 frames play (30 seconds at 60 fps); a longer file plays its first 1,800 frames.
Does a Lottie layer keep the file's colors?
Yes. A new Lottie layer draws each shape in the color the file paints it: its stroke or fill color, and the first color of a gradient. Every color is drawn at full laser brightness, so a dark navy draws as a bright blue, and black and gray draw white, because a laser cannot draw black. A connected laser, DOWNLOAD ILDA and the ILDA Viewer get the same colors as the canvas.
To draw the whole layer in one color, open COLOR in PROPERTIES and click a color in the palette. Preserve source colors switches OFF and the layer draws in that color. Switch Preserve source colors back ON to return to the file's colors.
While it is on, the section lists the file's colors as swatches and the COLOR header reads SOURCE COLORS; while it is off, the header shows the one color.
Does an SVG layer keep the file's colors?
Yes, when the file names them. An SVG that paints its shapes in colors — a logo sent from Image to Laser with Preserve source colors on, a multi-color SVG dropped on SOURCE, a colored icon — draws each shape in its own stroke or fill color at full laser brightness, exactly as a Lottie layer does, on the canvas, on a connected laser, in DOWNLOAD ILDA and in the ILDA Viewer. The same Preserve source colors switch appears under COLOR for these layers: pick a palette color to draw the whole layer in one color, and switch it back on to return to the file's colors. An SVG that names no color, such as a plain outline or a currentColor icon, draws in the layer color as before, and COLOR shows only the palette.
Layer Motion
Animation Studio separates three different jobs so controls do not overlap:
- Morph changes the layer's source geometry into a target shape (Circle, Square, Triangle, Star, or Heart) and can ping-pong back, with its own duration and easing.
- Modifiers apply reusable path motion and appearance: writing, tracer tails, glitch, sparkle, pulse, color, masking, and generators.
- Keyframes and Motion Paths move, scale, rotate, or route the complete layer over the timeline.
There are no separate Draw-In, Tracer, Glitch, Sparkle, or Flicker layer modes. Add the matching modifier instead, then stack or audio-bind it like any other path effect.
Timeline & Keyframes
Select a layer and press K (or F6) to insert a keyframe of its current property values at the playhead. F7 inserts a blank keyframe that resets properties to defaults, and F5 extends the layer's lifespan to the playhead. Once a property has at least one keyframe, auto-keyframing kicks in: moving, scaling, or rotating the layer on the canvas records a new keyframe at the current time automatically.
Moving the playhead switches the canvas to VIEW. Click EDIT under EDITOR at the bottom of the Properties panel before you drag the layer; typing a value under TRANSFORMS works in either mode.
TRANSFORMS follows the playhead: while the timeline plays, and wherever the playhead stops, POSITION, SCALE, and ROTATE show the layer as it is at that moment, between keyframes too. Typing a new value into a property that has keyframes adds a keyframe at the playhead, or updates the one already there. A property with no keyframes changes for the whole timeline. On a layer that follows a motion path, POSITION shows the live path position and is read-only. With auto-orient on, ROTATE also shows the live angle and is read-only. The panel says Follows motion path — edit in MOTION PATH; use MOTION PATH to change those values.
Keyframe-able properties:
- Position (X, Y)
- Size (animated as one uniform scale)
- Rotation
Color, morph settings, modifiers, and audio mappings are per-layer settings, not keyframe tracks; opacity is driven from the AUDIO tab rather than keyframed.
Reusable Modifiers
Open Modifiers in the Animation tab to stack the same path effects used by Image to Laser, Text to Laser, and Video to Laser: Trace Reveal, Color Flow, Color Ramps, Ink Settle, Glitch, Sparkle, Soft Pulse, Beam Runners, Sweep, Contact FX, Spotlights, Laser Cannon, Trace Bars, and Grid — on any layer type. Trace Reveal draws a moving leading dot and keeps the completed outline behind it; turn off Keep laser trace when only the dot should reach the laser layer. Most numeric controls can follow low, mid, high, level, or beat audio features. The layer preview and export render the same chain in the same order, including modifier changes made after a layer was first rendered.
Each modifier card has Play to rebuild the preview, return to the beginning, and play the chain, plus Reset to restore that modifier's defaults and clear its audio bindings, an enable/disable dot, and a remove button.
The panel opens with the same Quick Starts as the other laser workspaces — Write, Tracer, Glitch, Sparkle, Pulse, and Neon Ink, each an ordinary editable chain — with CLEAR to empty the chain and preset save/load to write and restore it as a shareable file.
A timed modifier automatically sizes its layer so the effect is not clipped. Entering Layer Duration switches that layer to manual timing: the layer may end before or after the modifier without changing the modifier's own duration.
Drag a keyframe diamond horizontally in the timeline to retime it — a diamond moves every property keyframed at that moment together. Press Delete/Backspace or right-click for Delete Keyframe to remove it. You can also drag a whole layer bar to shift it (keyframes move with it), trim its start and end edges, and use the timeline's Zoom In / Fit to View / Zoom Out controls to navigate long sessions.
Easing
Each keyframe stores an easing curve to the next keyframe. Choose from a large preset library — linear, ease in/out/in-out (quad through expo), back, bounce, and elastic — or pick custom to define your own curve.
Bezier Curve Editor
For precise easing control, select a keyframe and open the Bezier editor in the Animation tab of the Properties panel. Drag the control points to define the exact velocity curve.
Timeline Settings & Onion Skin
Two widgets in the Properties panel:
- TIMELINE (Properties tab) — session duration (up to 60 seconds), FPS, whether times read out in seconds or frames, and TRIM TO LAYERS to snap the session length to its content
- Onion skin (Animation tab) — ghost past and future frames on the canvas, with separate frame counts and opacities for past and future plus a frame step
Motion Paths
Assign a motion path to any layer to control movement over time. Pick a preset in the Motion Path panel:
- Linear — straight-line movement
- Arc — curved movement through a midpoint
- Circle — full circular orbit
- Figure 8 — infinity loop
- Wave — sinusoidal travel path
- Bounce — physics-style bounce with gravity
Each path has auto-orient (with a degree offset), loop with an optional Ping-Pong reverse, and the same easing family as keyframes — including back, bounce, and elastic. A live preview shows the path's shape and point count. Motion paths are configured from presets — they are not editable by dragging points on the canvas.
Transform Origin & Pivot Point
The Transform Origin selector in the Properties panel is a 9-position grid (corners, edge midpoints, center). It controls what point the layer rotates and scales around. Positive ROTATE values turn the layer clockwise, on the canvas and in the laser output.
Common use: set the origin to the bottom edge of a VU meter needle layer so it rotates like a real meter. See the VU Meter Needle recipe for a step-by-step example.
Canvas Tools
| Shortcut | Action |
|---|---|
G | Cycle grid: Off → Square → Center → Radial |
⌘/Ctrl + Click a tool button | Quick-place a 40×40 centered shape (click the tool in the Assets sidebar, not the canvas). On Sine Wave, ⌘+Click places a flat line and ^+Click places the wave |
Saved projects keep guide positions. Opening a project or applying a template replaces the guides on your canvas with that project’s guides.
The canvas toolbar also has rulers (toggleable) with draggable guides — drag a guide off the canvas to remove it, or use the clear-all-guides button — a snap-to-grid magnet toggle, a canvas background cycle (Off → Gray → White), and an alignment toolbar that aligns the selected layer to the canvas: left/center/right, top/middle/bottom, and Center. For the complete list, see Keyboard Shortcuts.
Templates and saving
TEMPLATES and SAVE sit at the right of the header, in the same place Audio Visualizers' Studio puts them.
TEMPLATES opens a searchable grid of starting points, each card listing its length, frame rate, and what it demonstrates. Applying one replaces the layers, timeline, and any loaded sounds and reactions; your projector settings stay as they are.
| Template | What you get |
|---|---|
| NIN TRACE | A logo written in two passes — a red trace that stays on screen and a white head that leads it, over about ten seconds |
| SCOPE TRACE | Two lines driven by live audio: the time-domain waveform above, the spectrum below. They sit flat until audio is playing, which is the trace telling you there is no signal |
| SCOPE XY (RENDER) | A true oscilloscope render generated from a waveform. Export only — see below |
| TALKING SHAPE | A face with a short speech clip. Press Play to hear the clip and watch the mouth follow it. The timeline matches the included clip |
SAVE names the animation and keeps it in this browser. The preview on the save panel is taken from the frame with the most drawn content rather than from the first frame, so a project that writes itself on over several seconds shows its finished artwork instead of an empty canvas. With a saved project open, the panel offers OVERWRITE or SAVE AS NEW.
Saved animations are listed under Settings → YOUR PROJECTS, each with its own preview. Opening one replaces the layers and timeline; DELETE removes it. Use EXPORT on a saved animation to download a project backup. The file keeps your artwork, timeline, guides, and audio assignments, but does not include the audio files or your projector settings. Choose IMPORT in YOUR PROJECTS to add a backup as a new saved animation, then open its card when you are ready. Importing keeps your current canvas open. Load the matching audio files again to restore their assignments.
SCOPE XY (RENDER) cannot be saved as a project. Apply it, then choose Download ILDA. If you want the scope look in something you can keep, use SCOPE TRACE, which reacts to live audio and saves normally.
Your projector profile and points-per-second limit are not part of a saved project. They describe your hardware rather than the artwork, so opening someone else's animation — or your own on a different rig — never changes what your safety checks measure against.
Settings
The settings gear in the header opens the LASER SETTINGS panel with seven tabs, landing on DISPLAY. Ctrl+K (Cmd+K on Mac) toggles it, Esc closes it, and ? jumps straight to the SHORTCUTS tab.
| Tab | Controls |
|---|---|
| Audio | The audio source every laser tool shares |
| Display | Rulers, canvas background (Off / Gray / White), grid on/off, grid type, grid size, snap to grid, grid color, grid opacity |
| Your Projects | Your saved animations — open or delete |
| Playback | Frame rate (24 / 25 / 30 / 48 / 60 fps), and whether times read out in seconds or frames |
| DEVICE | Your projector profile — Standard (30k), High-Speed (60k), Unlimited, or Custom with your exact kpps limit |
| Appearance | Theme and interface appearance |
| Shortcuts | Transport, keyframe, editing, canvas and shared shortcuts for this screen |
Grid color, opacity, and size have no other home — the canvas toolbar covers rulers, background, grid cycling, snapping, and guides, but the grid's look is set here.
Your DEVICE choice is what every safety check measures against, so it is worth setting before you build: pick the profile that matches your projector, or Custom to enter its exact rated speed. Frame rate and time display are remembered between sessions.
The audio chain
The AUDIO tab reads top to bottom as a signal chain, the same way a mixer strip or a synth voice does. Each stage is numbered, and each one only appears when it has something to show.
1 SOURCE
Five demo tracks — MUSIC, BASS, SAW, SINE, TALK — or drop your own (MP3, WAV, OGG, or M4A up to 50 MB). The drop target is a button, so you can reach it from the keyboard.
You can load more than one sound. Each appears in the list with its name, length, frame count, a stereo tag where it applies, what it drives, and REMOVE. Removing a sound leaves your layers and reactions alone.
The first sound in the list is the TIMELINE sound: it owns the beat grid, AUDIO TRIM, the waveform behind the layer rows, and the playhead. MAKE TIMELINE on any other sound moves it to the front and hands it that job.
Layers with no sound decides what an unassigned layer does — FOLLOW the timeline sound (the default, so a one-track project needs no setup at all), or STAY STILL until you give it a sound. Under FOLLOW, a layer whose sound is removed goes back to following rather than freezing.
2 ANALYSIS
VU METERS (with their own ON/OFF switch) show each channel's level as a bar and as a number, with a CLIP readout when a channel is peaking. BEAT GRID shows the detected tempo, beat and bar counts, and the first beat's offset; ÷2 and ×2 correct a detector that locked onto half or double time, and if nothing is detected you can type a BPM in directly. MATCH LAYER TO TRACK stretches the selected layer to the full length of the track, extending the timeline if it has to. It uses the track's length to the nearest frame at the project's FPS (for example 16.57S, 497 frames at 30 fps), so the last frame of an export is still drawn and a looping file has no blank blink. When the timeline is shorter than the track, 3 MODULATION says so and offers EXTEND TIMELINE TO the same length.
3 MODULATION
This is what the tab is for: driving a parameter from the music. + ADD REACTION creates a row, and each row connects:
- Source — RMS (overall level), Bass, Mid, High, or Beat
- Target — Scale, Scale X, Scale Y, Rotation, Position X, Position Y, or Opacity. SCALE X and SCALE Y stretch one axis only, along the layer's own axes, so a rotated shape stretches with itself rather than shearing. OPACITY dims the beam toward black: a laser has no transparency, so fading it means turning the light down. The position targets are marked (!) — audio-driven position throws deserve extra safety attention
- Drives — which layer this reaction moves. All layers is the default; pick one layer to scope the reaction to it alone
- Min / Max — the output range the audio value maps into. Changing the target brings its own sensible range, because rotation is in degrees and scale is around 1.0
- SMOOTHING — averages the track over a short trailing window before it drives the parameter. At 0 it follows every frame, which strobes on percussive material; higher values turn a kick into a swell
- Curve — Linear, Exponential, or Logarithmic response
Drives is how one track moves several shapes differently: add three reactions from the same track, set them to Bass, Mid and High, and point each at a different layer with Drives. A reaction left on All layers moves everything, which is what a single reaction does by default.
If a reaction's layer is deleted, the row reads Deleted layer — drives nothing and asks you to pick another layer or remove the reaction — the reaction is never thrown away with the layer. Duplicating or merging layers copies the reactions scoped to them, so the result behaves like the original.
If your timeline is shorter than the track, this stage says so and offers to extend it — otherwise reactions only play for as long as the timeline lasts and then appear to fall out of sync.
4 GEOMETRY · your layer
Per-layer, and covered under Audio Visualizer Layers below.
Audio-reactive parameters are baked into the ILDA file as a fixed animation authored from the selected track and trim. The exported .ild does not listen to venue audio; play it in sync with the same track or authored tempo to preserve the intended timing. See Audio-Reactive Features for the full explanation.
Audio Visualizer Layers
Beyond reactions, any layer can host a visualizer — stage 4 GEOMETRY on the AUDIO tab: Edge Deform, Radial Bars, Waveform, Loop Wire, or Lip Sync (or None to leave the shape as drawn). The first four have a Frequency Band selector (Full Spectrum / Bass / Mid / High) and a direction (Outward / Inward / Both); Lip Sync instead has attack, release, and vowel-threshold controls. See Audio-Reactive Features and the Spectrum Analyzer Bars recipe.
Giving layers different sounds
With more than one sound loaded — or a single sound with STAY STILL — each timeline layer row gains a numbered button next to lock, visibility, duplicate and delete: it names which sound that layer listens to. A dash means the layer has no sound of its own and is following whatever Layers with no sound says.
This is how two mouths lip-sync to two different voices.
There is a second route that needs no second file at all: if both voices are in ONE stereo file, load it and use the LR button that appears on each layer row when a file's two channels genuinely differ, and send one layer to LEFT CHANNEL and the other to RIGHT CHANNEL (or back to BOTH CHANNELS). No sound assignment is involved, so this works with a single file loaded. Prefer it when the timing between the voices matters — one file is one playhead, so the two can never drift apart.
Every loaded sound plays together on one playhead, and the exported video contains all of them mixed.
What a saved project remembers
Saved projects do not include audio files. Add the matching files again after reopening a project. The project keeps your audio assignments: your reactions, the Layers with no sound setting, and which sound each layer was listening to, by filename.
So reopening a project shows the canvas without its audio and names the files it is waiting for. Add them back and every layer returns to the sound it had — you re-supply the files, never the setup.
Beat Grid Snapping
When audio is loaded, snap keyframes to detected beats:
- Load a track under 1 SOURCE on the AUDIO tab
- Confirm the tempo under 2 ANALYSIS — use the ÷2 / ×2 buttons if the detector locked onto half or double time
- Enable the Snap checkbox in the timeline controls and pick a subdivision: Beat, 1/2, 1/4, or 1/8
- Keyframes snap to the beat grid when dragging, and a beat overlay appears on the timeline
Live laser output
The Convert / Live switch floating at the top of the workspace streams vector animations to a laser. Continuous XY layers from the Oscilloscope converter or Lissajous Stereo mode currently show an output-unavailable message instead. In Live, the Laser Output panel appears at the top of the Properties sidebar (the sidebar opens itself on the switch): choose Preview, the Simulator, or a supported DAC — Helios directly, Ether Dream and LaserCube through the Bridge app — confirm the two-step Arm, then press Start. The playing frame goes to the projector at your DEVICE profile's point rate. If the output settles into a dot that stops moving, the laser fades out after about 1.5 seconds and Beam blanked: output not moving appears in amber under Arm (or in the dock) until it moves again — see Motion guard. Connected hardware brings up the bottom-edge safety dock with Power, Arm, Blackout, and Start. The panel's Frame rate slider drives the same frame rate as the Playback settings tab, snapping to its 24 / 25 / 30 / 48 / 60 fps set — lower it for more points per frame, raise it for less flicker — and Galvo speed, Output scale, Power limit, Corner brightness (Advanced), and Color delay (Advanced) are documented in full under Laser DAC Output, and the color delay is remembered per DAC. The Convert/Live choice is remembered with your session. Press Esc (or Ctrl+B / ⌘B) to black out from the keyboard; Ctrl+A / ⌘A and Ctrl+S / ⌘S press Arm and Start — see keyboard control. A MIDI pad or fader can also black out or stop the laser — see MIDI blackout.
Exporting
When your session has content, an export bar appears with three buttons: Download ILDA, Projection Mapping, and Open in ILDA Viewer →.
Download ILDA
Downloads the complete animation as a Format 5 (true color) .ild file immediately — there is no export dialog on this path. Hover the button to see which POINTS choice the file uses.
Choose the points: SCANNER-SAFE or KEEP ORIGINAL
POINTS sets what every ILDA file from Animation Studio contains. Find it in the Properties panel under SAFETY → ILDA FILES, just below the Point Budget and its device selector. The same control appears in the Projection Mapping dialog; both show one setting.
Each button shows how many points the busiest frame holds with that choice, for example SCANNER-SAFE (699) and KEEP ORIGINAL (1,601). Under the buttons, FITTED TO 30,000 PPS AT 30 FPS · SHAPE, CORNERS AND BLANKING KEPT tells you the rate and frame rate being used.
| Choice | What the file contains |
|---|---|
| SCANNER-SAFE (default) | Each frame is fitted to your scanner: the most points the ILDA Viewer's FILE HEALTH rates SAFE at the DEVICE profile's point rate and your Playback Frame Rate. That is 699 points at Standard 30k and 30 FPS. Every corner of the shape is kept, the remaining points are spread along the lines between them, and the jumps between strokes stay blanked. Artwork outside the canvas is left out of the file. A frame that already fits is left as drawn. |
| KEEP ORIGINAL | Every point of every frame, exactly as composed. An Oscilloscope or Stereo XY layer keeps every sample at its own rate. When that is more than your scanner can draw, a notice says so first, for example: "1,601 POINTS IN THE BUSIEST FRAME NEED 48 KPPS AT 30 FPS — OVER THE SELECTED 30K POINT RATE. POINT-COUNT ESTIMATE ONLY." |
Some artwork has more corners than a scanner can draw in one frame at your frame rate, such as dozens of spiky shapes at once. Then the line reads TOO COMPLEX TO KEEP EVERY CORNER, and a notice below it says how much was left out, for example: "12 OF 60 FRAMES NEED MORE POINTS THAN 30K CAN DRAW AT 30 FPS: 340 CORNERS LEFT OUT. LOWER THE FPS OR THE DETAIL, OR CHOOSE KEEP ORIGINAL." Those frames keep their most prominent corners. To keep all of them, lower the Playback Frame Rate, simplify the artwork, or choose KEEP ORIGINAL for a player that can draw more points.
SCANNER-SAFE is what makes an Oscilloscope layer playable at 30k. A 48 kHz or 96 kHz recording holds 1,600 or 3,200 samples a frame at 30 FPS. With SCANNER-SAFE, each frame keeps one loop of the figure when the figure repeats, so the points go into one clean pass. When the figure changes partway through a frame, both shapes are kept. Keyframes, audio reactions, and modifiers are already in each frame, so the fitted file moves the same way the animation does.
The choice applies to Download ILDA, Open in ILDA Viewer →, and the .ild files from Projection Mapping, so all three give you the same frames. The Point Budget, the POINT BUDGET, and the point count under the canvas all describe the file you will get. Live output does not use this setting: it sends the frames exactly as composed, at the DEVICE profile's point rate. Continuous XY layers are not available in Live yet — see Live laser output.
ILDA download gating (Studio feature). Studio subscribers get clean unlimited downloads. Below Studio you get 3 clean exports per calendar month, shared with every other BT Laser Studio tool, OSC-1 and the ILDA Viewer, resetting on the 1st. Every export is clean, and the allowance needs an account — signed out, the status line above the button says to sign in for your free exports. See Export to ILDA and Pricing.
Export for Projection Mapping
The Projection Mapping button opens the EXPORT FOR PROJECTION MAPPING modal, which renders a synchronized video + laser package for hybrid shows:
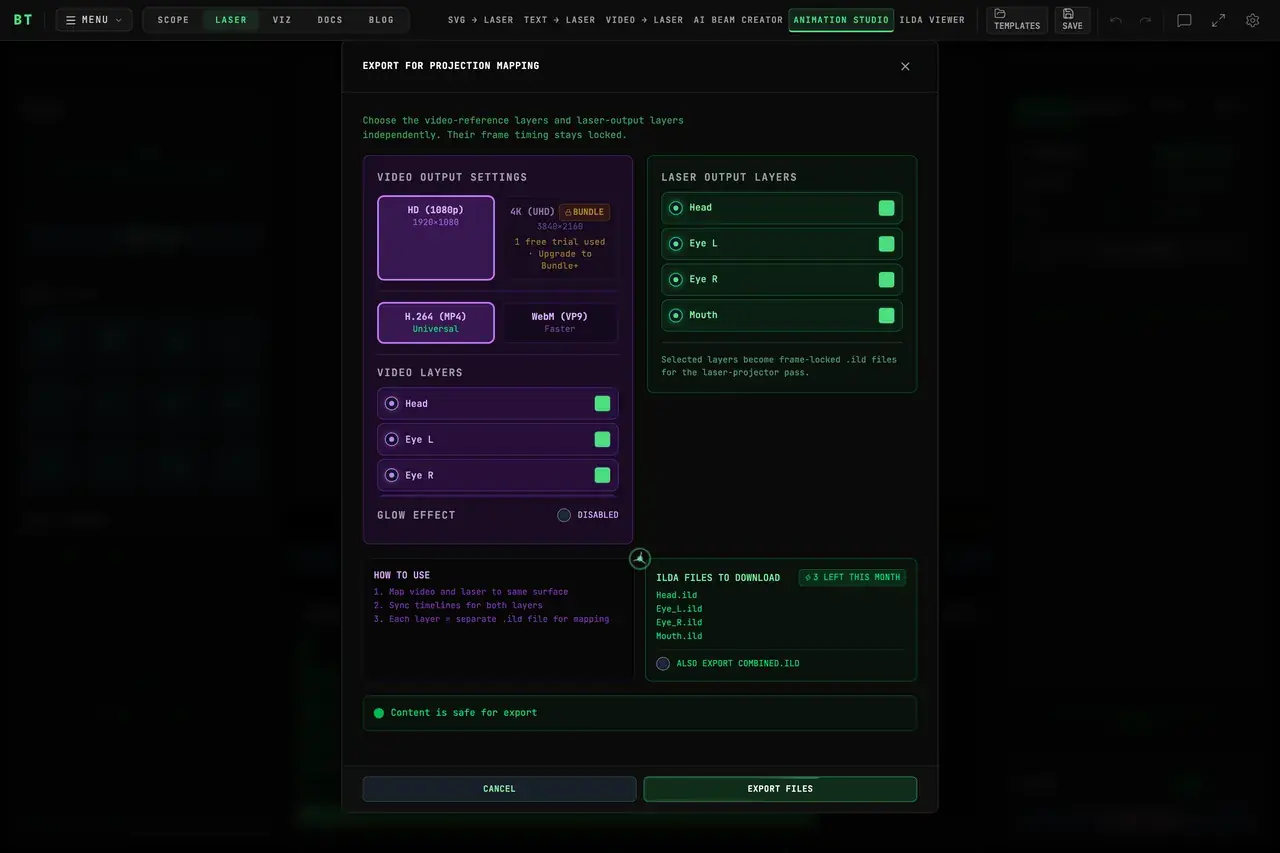
The purple VIDEO OUTPUT SETTINGS and green LASER OUTPUT LAYERS lists are independent. A layer can appear in the video reference, the laser-projector pass, both, or neither. Each row shows the layer name and color; the laser list also shows its animation type. Hidden layers are never exported.
Video output settings
| Control | Choices and behavior |
|---|---|
| Resolution | HD (1080p) at 1920×1080, or 4K (UHD) at 3840×2160. The 4K choice shows the available trial or upgrade state. |
| Format | H.264 (MP4), labeled Universal, or WebM (VP9), labeled Faster. |
| SOUNDTRACK | Appears when a loaded sound is genuinely stereo: MIX TO MONO (safe on headphones) or KEEP STEREO (panning is deliberate). |
| Video Layers | Check exactly which layers appear in the video reference. |
| Glow Effect | Enable or disable an oscilloscope-style glow on the video. It does not alter the ILDA paths. |
The package renders at the frame rate set in Settings → Playback (24–60 fps); the same rate drives the synchronized video and laser timeline.
When Glow Effect is enabled, choose Oscilloglow, Neon Intense, Subtle Glow, Laser Simulation, or Custom from Style Preset and inspect the result in Live Preview. Advanced Settings exposes:
- Glow Radius — spread around each line;
- INTENSITY — glow brightness;
- Falloff — sharp or gradual fading;
- Glow Color and Core Color;
- Show Grid and, when enabled, Grid Size.
Free accounts see the made with BeamTracer.com video-watermark notice before export. The burned-in mark slowly bounces so it cannot sit in one corner.
Laser and ILDA output
Check each layer that should become a separate frame-locked .ild file. The ILDA FILES TO DOWNLOAD panel previews those filenames before export. With two or more laser layers selected, enable ALSO EXPORT COMBINED.ILD when you also need one file containing all of them.
POINTS under the laser layer list is the same setting as SAFETY → ILDA FILES (SCANNER-SAFE or KEEP ORIGINAL). With SCANNER-SAFE, an Oscilloscope layer exports at any DEVICE profile. With KEEP ORIGINAL, a file above your scanner's limit shows the DANGER safety check and needs Expert Mode ticked before export.
The allowance badge shows how many of the three clean monthly ILDA exports remain below Studio. When the allowance is exhausted, selecting a laser layer shows the Studio upgrade prompt and changes the main action to UPGRADE TO EXPORT. Studio has unlimited clean ILDA exports. You can still make a video-only export by deselecting every laser layer — video exports draw on their own monthly allowance, and the modal says so when that one needs a sign-in or has been used up.
Timing and projection workflow
The modal's HOW TO USE panel summarizes the venue workflow:
- Map the video and laser to the same surface.
- Synchronize the playback timelines.
- Assign each separate
.ildfile to its mapped laser layer.
The package uses one timeline for every output. Video frame 1 matches ILDA frame 1, video frame 2 matches ILDA frame 2, and so on; the audio starts from the same zero timestamp. Complex frames can take longer to export. Match playback rates in your players and verify alignment and timing on the actual video projector and laser equipment; matching file timelines does not guarantee synchronized physical output.
If project audio is loaded, it is included in the video automatically. A project with no audio produces a video-only reference. The timeline control stops at 60 seconds, which is inside the free 5-minute length for an export with audio. The one free full-length export and the 240-minute ceiling for longer audio exports are described in Studio export and Video Export.
Safety, actions, and results
Before export, the safety panel shows Content is safe for export or lists warning/danger details with the number of affected frames. Dangerous content requires the Expert Mode responsibility acknowledgement before the main action becomes available.
- CANCEL closes the dialog before an export starts; closing the dialog mid-export aborts the run.
- EXPORT FILES begins a safe, entitled package.
- A blocked safety acknowledgement changes the action to ACKNOWLEDGE TO EXPORT.
- An exhausted monthly ILDA allowance with laser layers selected changes it to UPGRADE TO EXPORT.
During export, the dialog reports the current step, frame number, total frames, and percentage. On completion the files download automatically, and the EXPORT COMPLETE screen lists the video reference, every per-layer ILDA file, and the optional combined.ild, each with its size and its own download button, plus DONE to close. If export fails, the error view shows the reason and TRY AGAIN.
4K video export is a Bundle feature — Free tier includes 1 trial 4K export. Free-tier video exports carry a "made with BeamTracer.com" watermark burned into the frames; the modal warns you before exporting. Per-layer .ild output uses the same three-clean-exports-per-month allowance as other ILDA exports below Studio; Studio is unlimited.
Trial credit is used only after the requested artifact completes successfully; a failed export does not spend it.
Open in ILDA Viewer
Hands the current animation straight to the ILDA Viewer — useful for the 3D beam preview, safety analysis, or converting to other ILDA formats via the Viewer's export dialog.
Point Budget
The POINT BUDGET sits under the timeline whenever the safety report has per-frame data — no switch to find. Each frame is colored green (safe), yellow (near your scanner limits), or red (dangerous) against the device profile from Settings → Device, alongside live points-per-second and point-count readouts.
When problems exist, the Fix Issues button lists targeted fixes — Reduce Detail, Cap Jump Distance, Add Corner Dwell, Optimize Blanking, and Slow Dangerous Segments — each with its estimated improvement. The SAFETY tab in the Properties panel holds the full report.
Further Reading
Video to Laser
Convert video files to ILDA laser graphics — or trace a camera, screen, file, or BeamTracer visualizer in real time with LIVE mode, stackable effect modifiers, audio bindings, and grid calibration.
ILDA Viewer
Load, inspect, and analyze ILDA files with the professional viewer — file health, galvo simulation, stress heat map, playback, live output and 3D beam preview, with advanced diagnostics a switch away.