
3D Beam Viewer
Preview ILDA files in a 3D venue environment with camera presets, beam modes, human figure for scale, and Cinema mode.
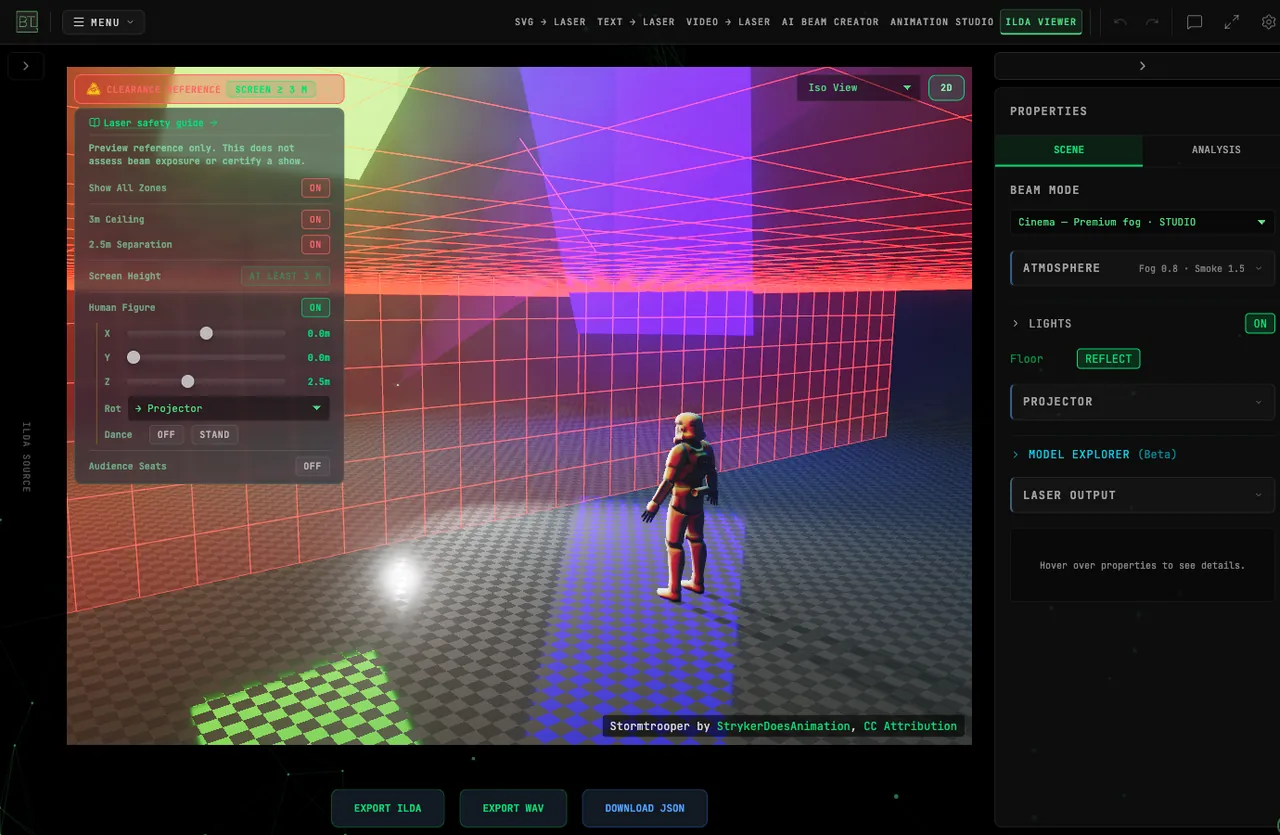
The 3D Beam Viewer is a mode inside the ILDA Viewer — not a separate tool. It lets you preview your ILDA content in a simulated venue, before you ever connect hardware. Seven camera presets, a human figure for scale, and multiple beam modes from a fast preview to full volumetric Cinema fog.
Opening the 3D Viewer
Load a file in the ILDA Viewer, then switch to 3D with the 2D / 3D toggle in the top-right corner of the canvas. The 3D view replaces the 2D canvas and shares the same playback controls and file — switch back to 2D the same way at any time.
Camera Presets
In 3D mode a camera dropdown appears next to the 2D/3D toggle. Seven presets are available:
| Preset | View | Use For |
|---|---|---|
| Audience View | Front, eye level | How the crowd sees the show |
| Iso View | ~45° off-axis, slightly looking down | Reading the beam cone as a volume — the angle that shows depth |
| Overhead View | Directly above | Mapping beam coverage zones |
| Side View | Directly to the side | Verifying horizontal spread |
| Projector View | From the scan origin | Seeing the beam as the projector throws it |
| Follow Target | Tracks the content | Keeping the pattern centered |
| Orbit Mode | Slow auto-rotation | Hands-free turntable inspection |
Regardless of the preset, you can always steer the camera by hand: left-drag to orbit, right-drag to pan, scroll to zoom.
Beam Modes
Beam modes are chosen from the Beam Mode selector in the Scene panel. Every mode is fully interactive on the free tier — content just renders with a BeamTracer watermark until you upgrade. The tier shown below is what removes the watermark for that mode.
| Mode | Tier | What you see | Requires |
|---|---|---|---|
| Off | Free | Pattern only — the projected shape with no beam rendering. Fastest; useful for checking content structure. | — |
| Basic | Free | Simple line rendering of beam paths with additive glow. Fast and accurate. | Any browser |
| HD | Pro | Volumetric beams with real thickness and depth, closer to how lasers appear to the eye. Width sets the beam thickness. | — |
| Translucent | Bundle | Semi-transparent beam simulation showing beam cross-section visibility from all angles. | Chrome or Edge |
| Galvo | Bundle | A traveling scan point with a fading trail and a fan of beams. It shares the 2D galvo simulation's TRAIL, PREVIEW SPEED, MIRRORS and SCANNER controls in the Analysis tab, so switching between 2D and 3D keeps your settings. MIRRORS chooses IDEAL (the default), the file's exact lines at any speed, or PHYSICS, an estimate of what real mirrors draw at your file's scan rate. This is a simulation, not a prediction or safety check for a particular projector. | — |
| Haze | Bundle | Volumetric light cones through a simulated atmospheric haze layer. The cone follows the same simulated scanner as Galvo, with the same TRAIL, PREVIEW SPEED, MIRRORS and SCANNER controls. | A capable GPU helps |
| Cinema | Studio | Full premium venue simulation — volumetric fog, venue lighting, floor styles, and the Model Explorer, drawn by the same simulated scanner as Galvo and Haze. See Cinema Mode below. | Current Chrome or Edge |
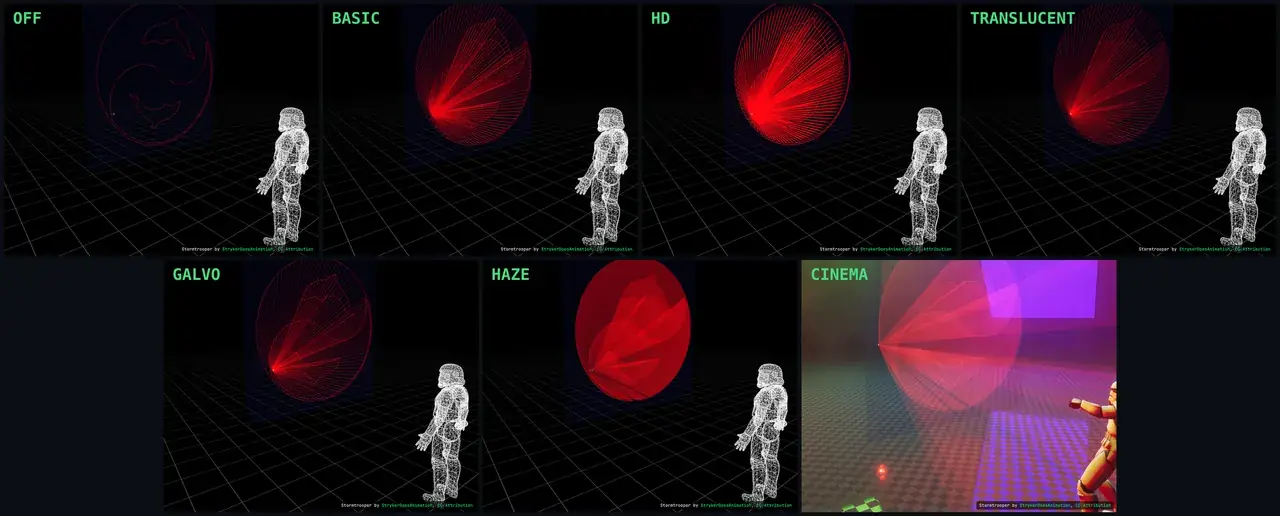
Every tile above is the same frame from the same camera, with the human figure on for scale, so what changes between them is only the beam rendering. Two things worth reading off it: Off shows the projected pattern without beams (fastest, and the cleanest way to check content structure), and Cinema's density is the Fog and Smoke sliders rather than a fixed look — the tile shows them mid-range.
For choosing between these in practice — and for fixing a preview that reads wrong — see Getting the Beam Look.
Comparing Galvo simulation settings
Galvo, Haze and Cinema draw from one simulated scanner. They open on IDEAL, the design as drawn. TRAIL sets how long each stroke's light stays on screen, without making the beams brighter — at a long trail and full PREVIEW SPEED the whole pattern is visible, scanned point by point in real time; slow PREVIEW SPEED down and you watch the beam travel. MIRRORS and SCANNER apply to all three modes, so what you see in Haze or Cinema is the same scan you inspected in Galvo.
In Galvo mode with MIRRORS on PHYSICS, softly rounded corners, small entry tails after jumps, and shapes that deform at higher scan rates are the simulation working, not a rendering fault. The mirrors always move at the scan rate set by DEVICE under FILE HEALTH, so slowing PREVIEW SPEED down lets you watch that motion without changing it. Use it to compare the visible effect of the simulation settings; actual projectors can behave differently:
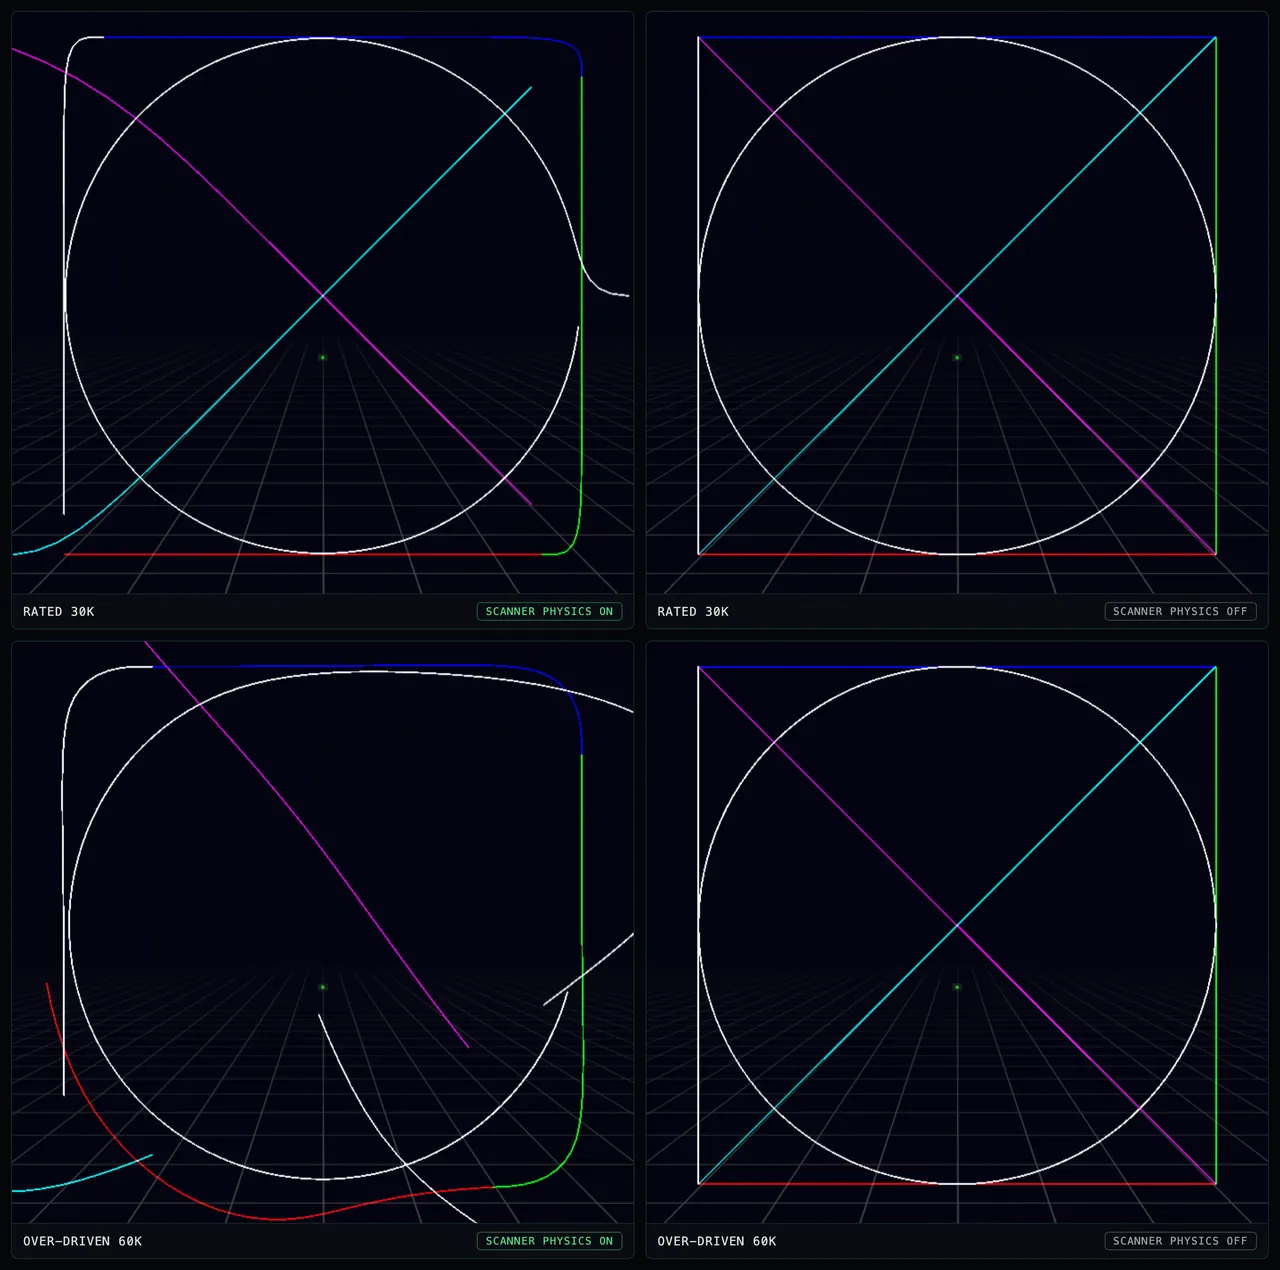
Read it left to right: the left column is PHYSICS — faithful at the rated 30K, visibly degraded when over-driven to 60K, within this simulated preview. The right column is IDEAL — geometrically perfect lines at any speed, the setting to use when recording clean footage or previewing animation artwork. To over-drive the simulated mirrors, set DEVICE to a faster profile than the SCANNER class below. A file with too little blanking between shapes will also show curved entry swoops with physics on; that is the simulation telling you the file needs more blanking, and the File Health panel will say the same.
While PHYSICS is selected, the SCANNER buttons underneath it choose which class of scanner the mirrors simulate:
- PREMIUM 60K — a top-tier scanner: content stays faithful up to a 60K scan rate, and only degrades beyond it.
- STANDARD 30K (default) — a well-tuned professional scanner, rated at 30K.
- BUDGET 40K — an entry-level scanner: shapes stay legible at 30K but edges come out visibly wavy and static features dither, and raising the speed collapses the image an octave earlier than the standard class. Use this preset to explore a less stable preview; it does not measure or diagnose your equipment.
While PHYSICS is selected, SCAN ANGLE (5° to 60°, default 40°) sets the optical angle the projector draws the full pattern at. The pattern stays the same size on screen; only the distance the simulated mirrors travel changes. A narrow angle is easier on the mirrors, so corners tighten and shapes hold at higher scan rates; a wide angle shows the same scanner working harder. The ILDA 30K test pattern is rated at 8°, so set SCAN ANGLE to 8° to compare a scanner against its rating.
Use these presets, SCAN ANGLE and the DEVICE scan rate to compare simulated looks. Use the equipment manufacturer’s specifications and supervised hardware checks when choosing settings for a show.
Scene Elements
Scene objects are toggled from the Scene panel.
Human Figure
Enable the human figure to display a correctly-scaled silhouette in the scene (normalized to 1.7m, average adult height). Useful for verifying:
- Audience clearance height (the FDA 3m grid above the audience floor)
- Beam angles relative to performer position
- Scale comparisons for documentation
Use the position controls in the Scene panel to place the figure where your performer stands.
Audience & Seats
Toggle audience silhouettes and arm-chair seats for crowd reference, and position them with the panel controls.
Projector
Show or hide the projector model at the scan origin. Its height and depth are adjustable to match your physical setup.
Screen
Toggle a reference screen behind the scan field to show where the content sits spatially. In Cinema, beams land on a visible screen with a faint continuation past it, the way light gets through a projection surface, and carry on at full strength when the screen is off. (Shortcut: C in any 3D mode.)
Screen Height (Scr.Ht) raises or lowers the projection screen in the simulated venue, from 1m to 6m. It is worth setting deliberately: at its 1.5m default the content sits low in the venue, which is realistic for a floor-mounted projector but crowds the bottom of the frame from angled cameras like Iso View. Raising it to around 2–2.5m lifts the preview pattern clear of the scene floor. It does not change your ILDA content or hardware output.
Analysis Overlays in 3D
The Analysis tab's overlays — Stress Heat Map and Scanner Path, plus Waveform and Density once switched on under LASER SETTINGS → ADVANCED (see the ILDA Viewer's Advanced tools) — work in 3D as well as 2D. They are drawn on the screen surface, in the scene, so they sit in 3D space alongside your content rather than floating over the viewport.
Turned the oscilloscope on and can't see it? The waveform is drawn at the bottom of the screen surface, so when the screen sits low the trace can end up level with — or underneath — the venue floor, where the floor grid hides it. Two fixes: raise Screen Height (Scr.Ht) in the Scene panel until the trace clears the floor, or orbit the camera below floor level to look up at it. It is being rendered either way; it is just underground.
The overlays also require the SCREEN to be ON in Cinema mode — they render onto that surface, so with the screen hidden there is nothing to draw them on.
Cinema Mode (Studio)
Cinema mode transforms the preview into a full venue environment:
Atmosphere: Fog and Smoke set the density of the volumetric atmosphere and Cone the opacity of the light cone through it. Cinema opens light, at Fog 0.2 and Smoke 0.3, so the beams read clearly from the first frame; raise both for a denser room. The beams themselves stay sharp at any setting; if the frame washes out, it is the atmosphere, so bring Fog and Smoke back down.
Venue Lighting: Three colored venue spotlights sweep across the scene. A master toggle and intensity slider control the set, and each of the three lights has its own color swatch and spin speed control (drag left for counter-clockwise, right for clockwise, with a global spin on/off).
Floor: FLOOR offers GRID or REFLECT, both visible, one selected:
- GRID — a simple grid floor
- REFLECT — a reflective checker floor that mirrors the laser pattern on the floor surface
Model Explorer: Click the Model Explorer button to load a GLTF model into the scene for scale and ambiance. Bundled presets include Iron Man, several Tron models (character, lightcycle, recognizer), and an animated Stormtrooper — or point it at any GLTF model.
Advanced: An advanced section tunes the Cinema look:
- RES — volumetric resolution
- STEPS — preview quality versus performance
- DENOISE + BLUR — smooth out volumetric noise, with a strength slider
Playback Controls
The 3D viewer shares the standard playback controls below the canvas — edit them once and both the 2D and 3D views update together:
- Play/Pause —
Space - Frame Step —
←/→ - Playback Speed —
</>(halve / double) - First / Last Frame —
Home/End - BEAT SYNC — set a musical loop length in the BEAT SYNC dropdown
Keyboard Shortcuts
| Key | Action |
|---|---|
Space | Play / Pause |
← / → | Previous / Next frame |
< / > | Halve / Double playback speed |
Home / End | Jump to first / last frame |
G | Toggle galvo simulation |
S | Toggle stress heat map |
B | Toggle scanner path (blanking) |
C | Toggle screen (3D modes) |
L | Toggle venue lights (Cinema mode) |
? | Show keyboard shortcuts |
Esc | Close modal / dialog |
Further Reading
Export to ILDA
How ILDA export works across BT Laser Studio — direct downloads in every creation tool, the Export ILDA dialog in the ILDA Viewer, and how tier gating applies.
Getting the Beam Look
A practical guide to the 3D beam modes and their sliders — how to get a specific look, fix a preview that reads wrong, and inspect the bundled test patterns before hardware calibration.