
Beat-Synced Animation
Use BPM detection and beat grid snapping to create laser animations that change exactly on the beat.
Beat-synced animation makes your laser show feel intentional and musical. Instead of shapes that change at arbitrary times, they switch exactly on every beat, bar, or phrase — like a drum machine.
What You'll Build
A laser animation with multiple layers whose keyframes land exactly on detected beats, plus a morphing shape transition timed to the music.
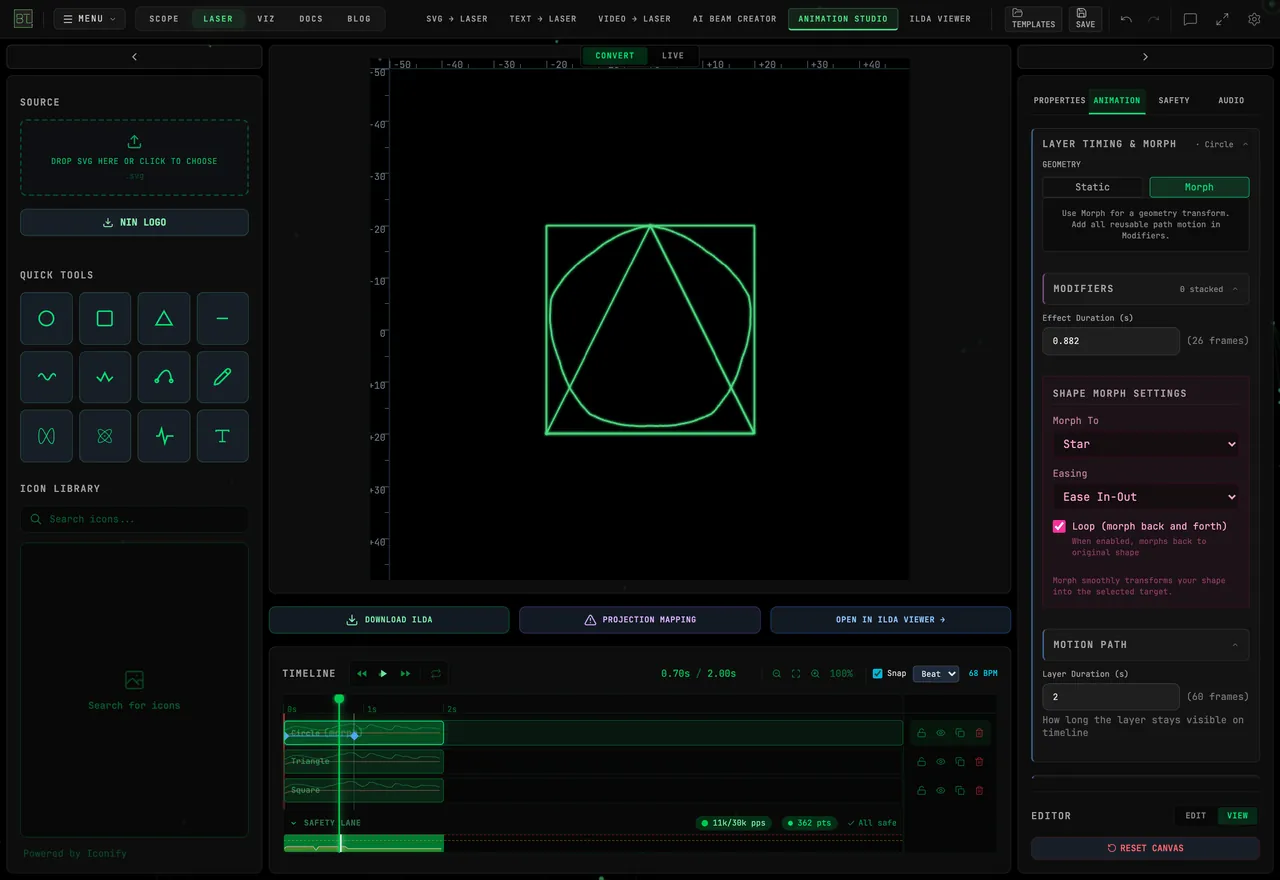
Step 1: Upload Your Audio
- Open Animation Studio
- In the Audio Panel, upload your track (MP3, WAV, OGG, or M4A)
- Wait for the analysis — BeamTracer detects the BPM and builds a beat grid
Step 2: Confirm the BPM
After upload, the Audio Panel shows the detected BPM:
- If correct: proceed to step 3
- If it locked onto half or double time (a common detector failure mode — e.g. 70 instead of 140): click ÷2 or ×2 to correct it
- If it's plain wrong: enter the BPM manually — the beat grid regenerates from your value
Step 3: Enable Snap
In the timeline controls, tick the Snap checkbox and pick a subdivision:
- Beat — one snap point per beat
- 1/2 — every half beat
- 1/4 — every quarter beat
- 1/8 — every eighth beat
For most uses, work at Beat first, then refine with finer subdivisions.
Step 4: Create Your Shapes
Add 2–4 layers for your beat-synced elements using the Assets sidebar quick tools (circle, square, triangle, etc.):
- Click a tool, then click the canvas to place it
- Set each layer's start time and lifespan in the timeline to cover different sections
Step 5: Place Keyframes on Beats
With Snap enabled, keyframes snap to the beat grid when you drag them:
- Select a layer and press
Kat the playhead to insert a keyframe - Move the playhead, change the layer's position/size/rotation on the canvas, and keyframe again
- Drag the keyframes in the timeline — they'll land exactly on the grid lines
Keyframes animate position, size, and rotation. Shape type is not a keyframe track — shape changes are done with the Morph animation type (next step).
Step 6: Add a Morph Transition
To make a shape transform on the music, use the Morph animation type:
- Select the layer, open ANIMATION → LAYER TIMING & MORPH, and choose Morph under GEOMETRY
- Choose a target shape (circle, square, triangle, star, heart)
- Set the morph duration to one beat length (60 ÷ BPM seconds) or a bar
- Enable ping-pong to morph back and forth in a loop
At 68 BPM, one beat lasts approximately 0.882 seconds. Enter that under Effect Duration, choose Star, and enable Loop (morph back and forth) for a repeating transition.
Layer Duration controls how long the layer remains on the timeline. Keep it long enough to show the intended cycles.
Step 7: Layer Multiple Elements
Repeat for other layers — each can run its own cycle. Classic combinations:
- Layer 1: Large background shape changing every 4 bars
- Layer 2: Mid-size shape cycling every 2 bars
- Layer 3: Small accent element cycling every bar
- Layer 4: An element with a Beat-source audio mapping for per-beat hits
For section-level variation, trim each layer’s start and end on the timeline. To make brightness respond to the track, add an Opacity reaction in the AUDIO tab and choose that layer under Drives; opacity is not a keyframe track.