
VU Meter Needle
Build an audio-reactive VU meter needle in Animation Studio using transform origin, rotation keyframes, and audio mapping.
A VU meter needle is one of the most satisfying laser graphics effects — a classic analog needle that swings with the music. This recipe walks through the exact steps in Animation Studio.
What You'll Build
A rotating needle layer whose angle tracks audio amplitude in real-time, baked into a playable ILDA animation. The needle pivots from its base, swings from left to right, and responds to the music like a real meter.
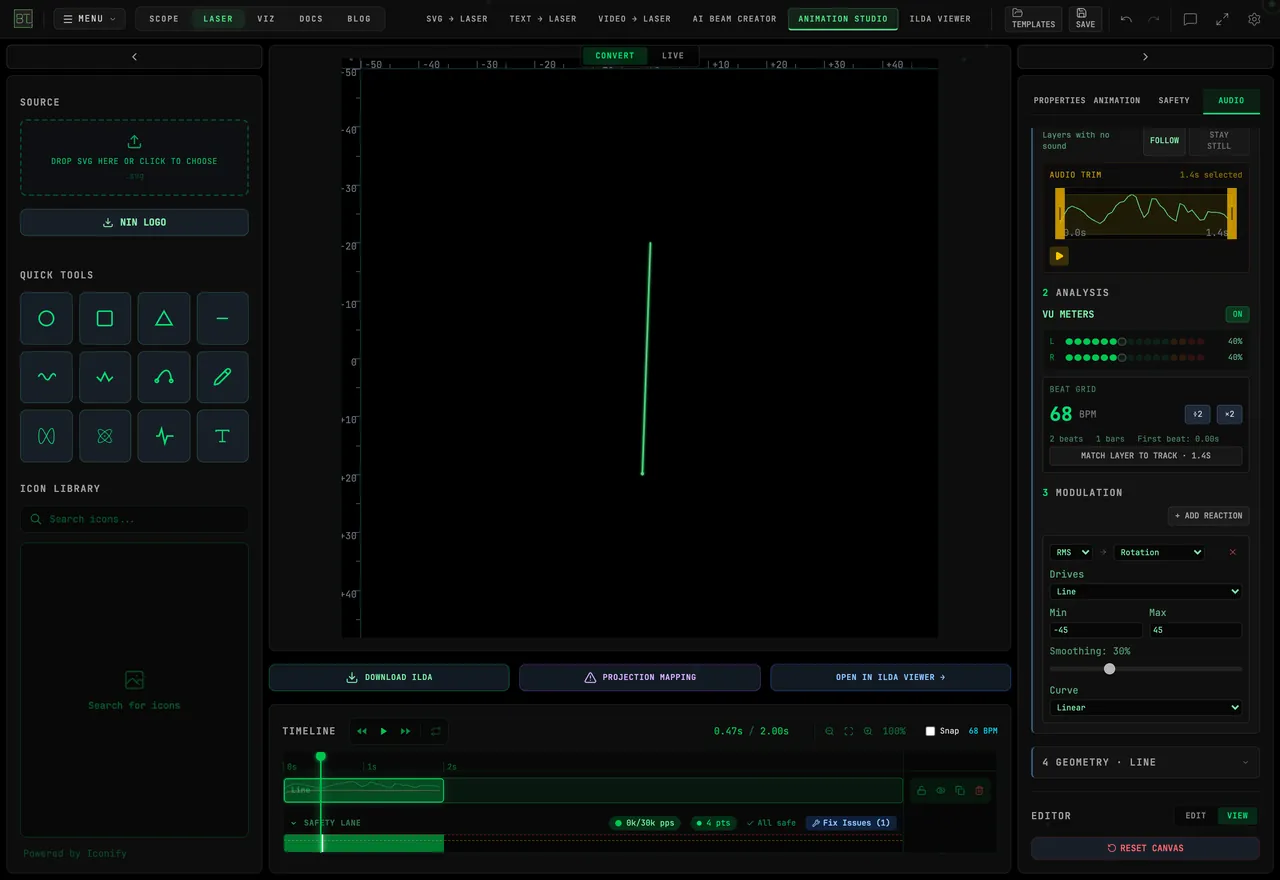
Step 1: Create the Needle Shape
- Open Animation Studio
⌘/Ctrl+Clickthe Line tool to place a centered horizontal line- In Properties → TRANSFORMS, keep its width around
40and set Rotate to270°so it points upward - In the Properties panel, set the Color to white or green
Step 2: Set the Transform Origin
Use the original line’s left endpoint as its pivot. After the 270° rotation, that endpoint is at the bottom of the needle:
- In the Properties panel, find the Transform Origin selector — a 9-position grid (corners, edge midpoints, center)
- Click Middle Left
This tells Animation Studio to rotate the needle around its base — like a real meter pivot. The origin is chosen from the preset grid; it isn't a draggable handle on the canvas.
Set Rotate to 270° and choose Middle Left in the pivot grid. The grid refers to the line before rotation; its left endpoint becomes the bottom of the upright needle.
Keep that resting rotation when adding the audio reaction. Min −45 and Max 45 add the swing around it.
Step 3: Set the Resting Position
- Select frame 1 in the timeline
- Press
Kto create a keyframe for Rotation - Keep the rotation at 270°. The audio reaction in the next step adds a swing of up to 45° on either side of that resting angle.
Step 4: Map Rotation to Audio
- Open AUDIO → 3 MODULATION, click + ADD REACTION, and set Drives to the needle layer
- Set Source to RMS (overall level)
- Set Target to Rotation
- Set Min to
-45and Max to45— the needle's swing range in degrees - Set Smoothing to about 30%, then adjust it while listening and leave Curve on Linear
Step 5: Add the Scale Arc
For a classic VU look, add a static arc behind the needle:
- Use the Bezier quick tool to draw an arc spanning the needle's sweep
- Match the arc radius to the needle length
- Center the arc above the needle's pivot
- Choose Static under ANIMATION → LAYER TIMING & MORPH → GEOMETRY, leave modifiers empty, and keep audio reactions scoped to the needle
- Lower its opacity or use a dim color so the needle stands out
Step 6: Add Tick Marks (Optional)
- Use the Freehand or Line quick tool to draw short tick marks arranged in a semicircle (from -45° to +45°)
- Make the layer static
Keep the meter parts together: ⌘/Ctrl+Click the needle, arc, and ticks layers to multi-select them so they stay aligned through export.
Step 7: Preview and Export
- Upload your test audio in the Audio Panel
- Press Play — the needle should swing left/right with the amplitude
- Widen or narrow the Min/Max range if the needle clips at maximum or barely moves
- Click Download ILDA to download the pre-baked animation
Tips
Use Smoothing to make the needle respond more gradually. It does not provide a peak-hold measurement.
For a two-needle meter, duplicate the needle layer and map one to Bass and one to High instead of RMS. Position them side by side — a frequency-split meter reads even better in laser than a stereo pair.
Keep the needle inside your configured safe area and inspect the complete animation in the Viewer. A smaller swing alone does not establish safe hardware operation.
Related Recipes
Live Laser Show from Any Video Source
Four ways to use LIVE mode in Video to Laser — the classic "laser writes the logo" reveal, a laser that follows your VJ rig, beat-driven effects, and a live camera silhouette.
Spectrum Analyzer Bars
Build a radial frequency-spectrum display in Animation Studio using the Radial Bars visualizer mode.