
Workout Timer Overlays
Build a single exercise or a complete workout schedule with section clocks, whole-workout progress, glass styling, and a clickable timeline.
The WORKOUT timer is an overlay for exercise videos, classes, stretches, circuits, and other timed sessions. It can run over a finished video, follow a music track, or work by itself while you plan the overlays first.
Prefer to watch? Trina times a whole multi-set workout in about two minutes.
You do not need music or video to build or play a workout. Start with a duration, arrange the sections, and add media later—or export the overlay over a solid blue or green background for another editor.
Start in one click
Open TEMPLATES, search for WORKOUT, and choose the built-in example.
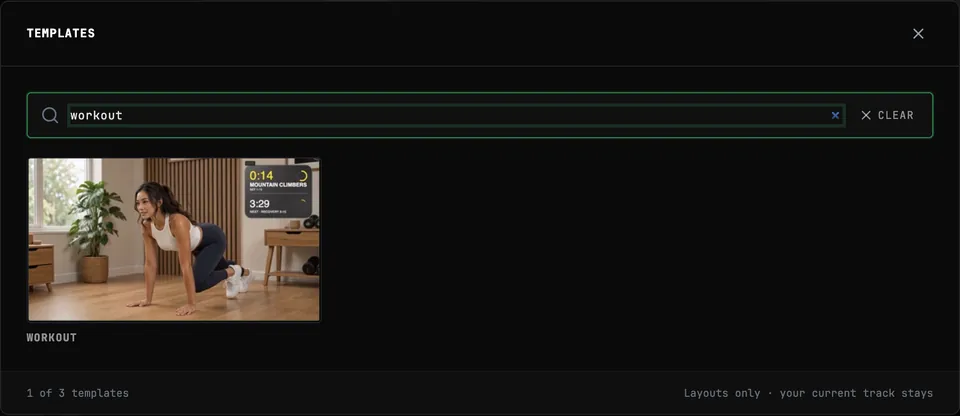
It includes a short workout video, a spoken-intro offset, a Warm Up, five named exercises, recovery periods, a Cool Down, and a goodbye offset. Everything is editable. The short sample video uses REVERSE looping so the movement repeats smoothly.
To build from scratch instead, choose TEMPLATES → BLANK, then ADD LAYER → TIMER → WORKOUT.
What viewers see
The rounded card keeps the current interval and the whole workout together:
| Element | What it shows |
|---|---|
| Interval clock | Time remaining or elapsed in the current exercise, recovery, pose, or transition |
| Interval ring | Progress through the current section |
| Section name | The current exercise or phase |
| Set number | The current set and total, such as SET 2 / 5 |
| Divider | Separates the current section from the whole-workout clock |
| Workout clock | Time remaining or elapsed across the complete timer window |
| Overall progress | A ring, line, card fill, or outline around the card |
| Next | The name and duration of the upcoming section |
Any section can be kept in the schedule but taken off the canvas. When it is, the card closes over the interval clock, name, set number, and divider, and only the workout clock stays on screen. See Hide a section from the canvas below.
Select the Timer layer to edit it. Settings start collapsed so the panel stays calm; open only the section you need. Studio remembers which groups you left open.
1. Choose the workout shape
Open WORKOUT SCHEDULE → WORKOUT SETUP.
- ONE WORKOUT makes one named timed exercise.
- FULL WORKOUT lays out several exercises, recoveries, poses, or stretches.
- HIIT starts an editable example with a Warm Up, named exercises, recoveries, and a Cool Down.
- YOGA starts an editable sequence of named poses and transitions.
Applying a starter replaces the current schedule. Undo restores the schedule you had before it.
Pick the duration source
| Source | Best for |
|---|---|
| DRAFT | Planning before the finished video or song exists; enter minutes and seconds yourself |
| VIDEO | Matching the loaded master video's duration |
| AUDIO | Matching a separate music track's duration |
The selected source is the authority for the workout overlay. Adding a video or song later does not silently retime a Draft. If the lengths differ, Studio shows the difference and offers USE VIDEO LENGTH or USE AUDIO LENGTH. If the schedule is longer than the project, FIT PROJECT TO SCHEDULE expands the project deliberately.
SCHEDULE includes the authored sections and the start and end offsets. PROJECT is the full overlay duration. These can differ when you leave space before or after the workout.
Leave room for the coach
Use START OFFSET when the video begins with the coach speaking before the workout clock appears. Enter minutes and seconds, or move the playhead and choose START AT PLAYHEAD · I. The timer remains hidden before that point.
2. Name and time each set
The set editor shows one compact page at a time, keeping the inspector from growing into a long list.
- Use the left and right arrows to move between sets.
- Rename the header from SET to CIRCUIT, POSE, BLOCK, or another term.
- Give every row its own name, duration in seconds, and color.
- COPY duplicates a row within the set; DELETE removes it.
- ADD SET creates another independent editable set.
- REPEAT SCHEDULE makes the requested number of independent copies. Changing one copied set does not rename the others.
A set can contain an exercise and a recovery, but it does not have to. Delete, copy, or rename rows to match the way the workout is actually taught.
Hide a section from the canvas
Coaches usually talk through a recovery or a transition instead of counting it down. Every row has an eye button to the right of its color swatch:
- The open eye is the normal state: the section is drawn on the canvas.
- Click it and it becomes a closed eye, and the row is outlined with a dashed border. That section still runs, still holds its place in the schedule, and still appears on the timeline — it just is not named or counted down on the canvas.
While a hidden section is playing, the glass card closes over the space the interval clock, section name, set number, and divider used, so no gap is left behind. The workout clock and overall progress keep running. If SHOW UP NEXT is off as well, the card shrinks further into a small square badge with the workout clock inside its progress ring. The card grows and shrinks smoothly whenever this changes, so nothing pops on or off.
On the timeline, a hidden section keeps its block in striped form. You can still click it to seek, and still drag its edge to change its length.
Use it for recoveries and transitions, or for a warm-up you would rather introduce by voice while the overall clock stays visible.
3. Work directly on the timeline
Select the Timer layer to see its colored lane below the canvas. The lane shows every visible workout phase, even when no waveform or music exists. The empty space before and after the colored blocks is the time reserved by your offsets.
- Click any colored block to seek to that phase and open its matching set.
- You can seek while playback is running; playback continues from the new section.
- Drag a block's right edge to change that section's duration.
- Click an empty point, then use START AT PLAYHEAD · I to move the whole schedule start.
The block colors follow the interval-ring colors, with the overall-progress color along the lower edge, so the timeline and card remain visually connected.
4. Decide what happens at the end
Open AFTER inside Workout Schedule.
END OFFSET keeps the timer hidden for the final part of the project, leaving space for a goodbye, credits, or a closing title. Enter minutes and seconds, or choose END AT PLAYHEAD. The card shrinks away rather than cutting out, the same way it does when a hidden section starts — and it grows back in at START OFFSET.
| Choice | Result |
|---|---|
| FILL TO END | Repeats the schedule pattern until it reaches the end of the active timer window |
| EXTEND FINAL | Keeps the final authored section on screen for the unused time |
| LEAVE REMAINDER | Stops when the authored schedule ends and leaves the unused time clear |
Hover or focus a choice to see its explanation before selecting it.
5. Choose clocks and progress
Open CLOCKS + PROGRESS.
- INTERVAL TIME can show REMAINING or ELAPSED.
- WORKOUT TIME independently supports REMAINING or ELAPSED.
- OVERALL PROGRESS turns the progress treatment on or off.
- Choose RING, LINE, FILL, or OUTLINE. Outline traces around the rounded card like a runner on a track.
- Fill can FILL UP or DRAIN through the card.
- SHOW UP NEXT controls the Next line. With it off, a hidden section reduces the card to a square badge.
- SHOW SET NUMBER controls the set count.
- USE PHASE COLORS lets each authored section color the active interval.
Elapsed interval clocks label the authored seconds from 1 through the section duration after the exact starting boundary. A 15-second recovery therefore holds 15 through its final display window and never shows 16. Remaining clocks finish on 0 at the final active frame.
Advanced clock controls
Switch to ADVANCED when the card needs more precise sizing.
You can change EXERCISE SIZE, SET SIZE, and NEXT SIZE for viewers watching from farther away. The interval ring and workout ring each have their own size, horizontal position, vertical position, and thickness. A Line or Outline shows its matching thickness control instead of the workout-ring controls.
The default places both rings on the right so the clocks and labels share one clean left edge. Move either ring to the left for a mixed layout; the nearby clock automatically makes room.
6. Style the glass card
In WIZARD, Glass + Appearance offers the most common starting looks.
Choose DARK GLASS, LIGHT GLASS, CLEAR, or SOLID. New workout cards use neutral charcoal glass and Anek Bangla by default.
In ADVANCED, the full appearance panel becomes available.
Use the advanced controls to reshape the card, tune the glass, and set each display color independently.
| Control | What it changes |
|---|---|
| CARD WIDTH / HEIGHT | Shapes the glass plate without changing the whole layer scale |
| GLASS EFFECT | Strength of the reflected glass treatment |
| BACKGROUND BLUR | Blur applied to the video seen through the card |
| CARD OPACITY | Strength of the tint plate; glass and blur remain visible at lower values |
| CORNER RADIUS | Roundness of the card |
| AUTO CONTRAST | Keeps text readable when switching between dark and light glass |
| Color swatches | Interval timer, section label, workout timer, progress, track, divider, tint, and border colors |
| TIMER FONT | Font used by the card |
7. Add a section change and final warning
Open TRANSITIONS + WARNING in Advanced mode.
- INSTANT changes sections immediately.
- FADE softens the switch.
- PULSE emphasizes the change.
- FINAL COUNTDOWN adds a visual warning during the chosen FINAL SECONDS of each section.
8. Position the card
Drag the selected timer directly on the canvas for fast placement. Open POSITION in Advanced mode for exact POSITION X, POSITION Y, and SCALE controls.
The dashed selection box and its TIME label fade after a few idle seconds so they do not distract from the preview. Move the pointer over the timer to show them again. The box tracks the card as it plays, so while a hidden section collapses the card the box collapses with it rather than outlining space the card no longer fills.
9. Save the project or reuse the timer
MENU → SAVE stores the entire project: media references, every layer, the complete workout schedule, and its appearance.
MY PRESETS is for carrying the timer into another project.
- ADD LOOK saves the card design without the workout schedule.
- ADD LOOK + SCHEDULE saves both the appearance and the section pattern.
Use the project Save button for work you intend to reopen as one complete video. Use a preset when the same timer design should be reused elsewhere.
Media and playback
- A workout can play silently with no media loaded.
- Adding music later does not replace a Draft duration unless you choose the Audio length.
- Adding video later does not replace a Draft duration unless you choose the Video length.
- If video is shorter than the project, choose FROM START or REVERSE in the Backdrop settings. The Workout sample defaults to Reverse.
- The timeline, workout clock, and section changes continue against the selected project duration.
Studio is an overlay editor: prepare the source video's picture and any burned-in audio elsewhere, then use Studio for timers, titles, song labels, graphics, and other timed overlays.
Related
- Workout timer overlay for long videos: many sets, one take — the illustrated walkthrough, including filming behind your own timer
- How to add a countdown timer to a workout video — the single-clip version, with a ring and a countdown
Related guides
Analysis, Playhead and Timer Layers
Put live analysis graphs, a progress playhead, or a running clock on the Studio canvas — the readouts that make a video feel like an instrument.
3 · Brand
Title and artist lines, extra text, cover art, logos, and icons — with fonts, shadows, timed cues, keying, and glass blur.