
The Workspace
Every part of the Studio window — the step strip, layers rail, preview, transport, settings rail, and status bar.
Studio is one screen. Nothing is hidden behind a mode switch, and everything you change is visible on the preview immediately.
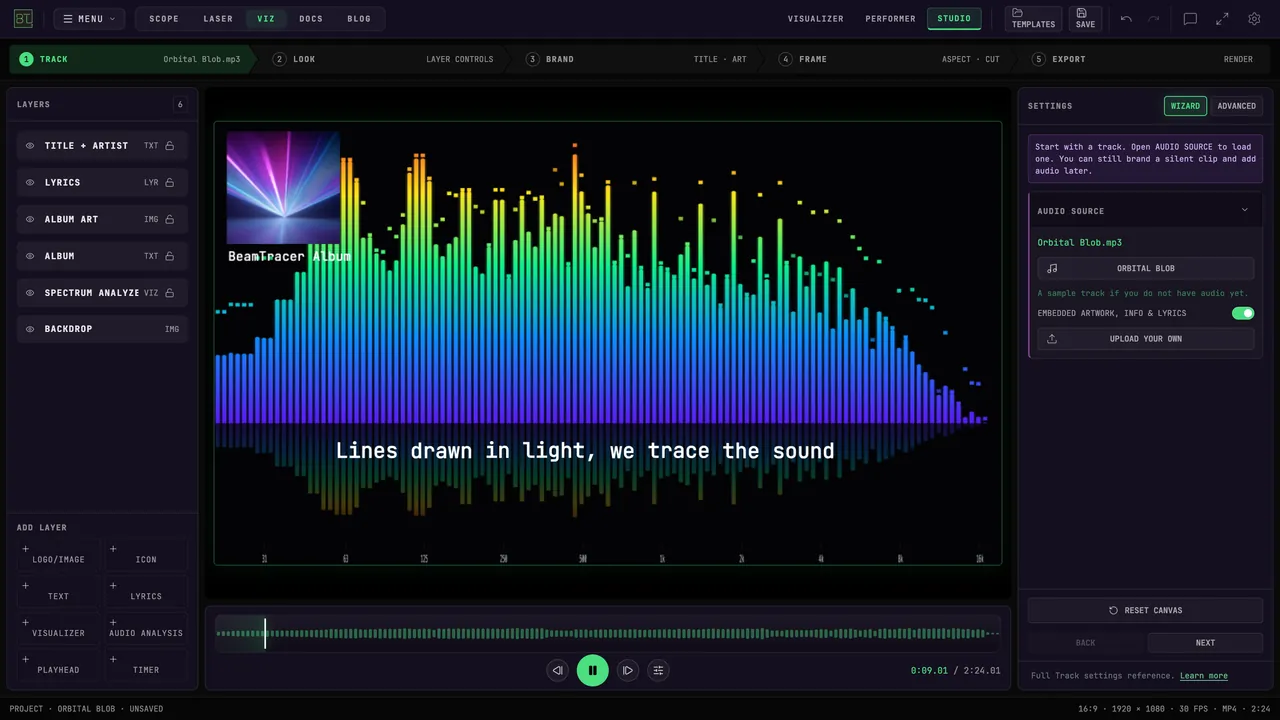
Header
The BeamTracer header sits above Studio and carries the app-wide controls:
- VISUALIZER · PERFORMER · STUDIO — the three Viz modes. Studio is the one you are in.
- TEMPLATES — the layout library. Applying one keeps your current track.
- MENU → SAVE — name and store this canvas in the browser.
- Undo / redo arrows — every canvas change is undoable.
- Gear icon — Studio settings: YOUR PROJECTS and SHORTCUTS.
Step strip
The numbered strip is the spine of the workflow: 1 TRACK · 2 LOOK · 3 BRAND · 4 FRAME · 5 EXPORT. Each step shows a live hint of its own state — TRACK shows the loaded file name, FRAME shows the current aspect, EXPORT shows READY once there is something to render. A step you have satisfied gets a check mark.
Click any step at any time. The strip decides what the settings rail shows; it does not lock anything.
Layers rail (left)
Select a row to edit that layer. The eye and padlock controls change visibility and prevent accidental movement.
The list is the canvas stack, topmost layer first. Each row has:
- an eye to hide the layer without deleting it,
- the layer name — hover a long one to scroll it into view,
- a type badge — TXT, IMG, VID, VIZ, LYR, AUD, PLAY, TIME,
- a padlock to hold the layer in place so a stray drag cannot move it.
Click a row to select the layer; its settings appear in the right rail. Shift-click or Cmd/Ctrl-click to select several — grouped layers move together.
Underneath, ADD LAYER puts a new element on the canvas. Four of the buttons — ICON, AUDIO ANALYSIS, PLAYHEAD, TIMER — open a picker in the rail first so you choose the style before it lands. See Layers.
Preview (center)
The preview is the actual composition at the actual aspect — what you see is what renders.
- Drag any unlocked layer to move it.
- Drag a corner of an image to scale it.
- When a text or image layer is selected, an alignment toolbar appears above the canvas.
- With a visualizer selected and the track paused, a card names the current visualizer and offers ‹ › arrows to step through the catalog.
Transport (bottom)
- The waveform strip shows the whole track. Click anywhere to seek. Loudness is drawn as bars; BEAT MARKS adds white ticks at beats and transients.
- MUSIC · VIDEO · MIX picks which source you are hearing and analysing. These buttons only appear once the project has more than one — a music track plus a video with its own audio.
- ‹| and |› step one frame back or forward and pause first, like YouTube.
- The round button plays and pauses — or, before you have loaded anything, uploads audio.
- The sliders icon jumps to the audio preferences.
- The clock on the right reads the playhead and total length.
When you set an export trim, a green box appears on the waveform — that box is the slice that renders.
Settings rail (right)
The rail always shows a one-line note about the current step, then the controls for that step or for whatever layer is selected.
WIZARD and ADVANCED switch how much it shows:
- WIZARD — only the decisions that matter for the step you are on.
- ADVANCED — everything, including fades, loudness, cues, trim, keying, and the full per-visualizer settings.
The toggle is per-step and it is not a permission gate; nothing is hidden from you permanently. The EXPORT step has no toggle — it shows one summary.
At the bottom of the rail: RESET CANVAS clears the composition back to the default layout, and BACK / NEXT walk the steps.
Status bar
The strip along the very bottom reads the project name and whether it is SAVED or UNSAVED, then the output spec — aspect, pixel size, frame rate, container, and length. It is the fastest way to confirm what you are about to render.