
Audio Input Setup
Every way to get sound into BeamTracer — tab audio capture, internet radio streams, microphone, audio interfaces, and DAW routing.
BeamTracer reacts to whichever audio source you select. Audio Visualizers and OSC-1 open audio from Settings → Audio. In Video to Laser, switch to LIVE and open Settings → Audio — the header gear lands there, and so does the sliders icon on the playback pill over the preview. The Visualizer mini player's sliders icon opens its Audio screen the same way.
Each app begins with a current-source summary. It names the source and its state — for example DEMO TRACK — ... — PLAYING, TAB AUDIO — LIVE, MICROPHONE — CONNECTING, or NO AUDIO CONNECTED. CHANGE opens the card chooser; CANCEL returns without changing the current source. OSC-1 also keeps its stereo L/R meters and correlation readout in this area.
Choosing an Audio Source
Beat-driven visualizers follow the new source when you replace audio. You do not need to reload the page to reconnect their beat response.
Click CHANGE to pick a source:
- TAB / SYSTEM AUDIO — capture anything playing on your computer (fastest, no installs)
- DEMO TRACK — built-in tracks tuned for the visualizers
- MICROPHONE / AUDIO INTERFACE — the chooser labels this card MICROPHONE; use it for a built-in mic, external mic, or audio interface
- AUDIO FILE — play your own MP3, WAV, FLAC, OGG, AAC, or M4A
- VIRTUAL AUDIO DEVICE (advanced) — route a DAW or mixer via BlackHole or Loopback
Audio Visualizers and Video to Laser Live also offer INTERNET RADIO for curated stations and custom stream URLs. OSC-1 keeps the same selection order and focused source screens for the sources it supports.
The chooser heading is CHOOSE AUDIO SOURCE. CANCEL returns to the summary, and BACK returns from any source setup screen to the chooser. The ADVANCED badge identifies VIRTUAL AUDIO DEVICE. Each setup screen then exposes only the controls that apply to that source:
| Setup screen | Controls and states |
|---|---|
| TAB / SYSTEM AUDIO | CONTINUE opens the browser share dialog and changes to WAITING FOR TAB… while the selection is pending. A denial or unsupported selection appears as an error on the same screen. |
| DEMO TRACK | SELECT A TRACK… lists the bundled tracks; choosing one returns to the summary. |
| MICROPHONE | The input toggle requests permission. MICROPHONE ACTIVE and the live level meter confirm a signal; AUDIO INPUT DEVICE selects the device and REFRESH rescans it. If no input is available, the screen says so and asks for microphone permission. |
| AUDIO FILE | LOAD AUDIO FILE provides DRAG & DROP OR CLICK TO BROWSE and changes to DROP AUDIO FILE while a compatible MP3, WAV, FLAC, OGG, AAC, or M4A file is over the target. |
| INTERNET RADIO | Choose a curated station or CUSTOM STREAM URL…, then press CONNECT. Invalid or non-HTTPS addresses produce an error on this screen. |
| VIRTUAL AUDIO DEVICE | VIRTUAL DEVICE selects the routed input, REFRESH rescans devices, and ENABLE INPUT changes to INPUT ENABLED after activation. |
Starting any source replaces the previous one, so the summary always identifies what drives the visualizer. Tab audio, microphones, virtual devices, and streams provide DISCONNECT or STOP. Demo tracks and audio files provide play/pause and a seek bar with current and total time. A live stream shows LIVE, its station name, and elapsed time instead of a seek bar because the stream has no fixed duration.
The summary's VOL or VOLUME control and the Ctrl+M mute shortcut affect only speaker output — the visuals always receive the full signal, so a muted or turned-down mix keeps reacting. In Audio Visualizers, use GAIN in Settings → Processing to change visual intensity.
Monitor, Playback Preferences, and Readouts
MONITOR switches between:
- SPECTRUM — compares the incoming signal with the signal used for visual response
- VU — stereo L/R level meters
For demo tracks, files, and streams, the playback area reports SAMPLE RATE, FFT SIZE, BASE LATENCY, and SIGNAL PATH. These readouts help confirm which source is active and whether the browser has established the expected audio path.
AUTO PLAY ON LOAD controls whether an available track starts when the app loads. Audio Visualizers also shows SHOW PLAYER ON LOAD for its mini player; Video to Laser does not need that preference because its audio controls stay in Properties.
Tab Audio — The Fastest Route (No Installs)
Play music in any other browser tab — YouTube, SoundCloud, a mix on any site — and visualize it:
- Open Settings → Audio in Audio Visualizers, OSC-1, or Video to Laser Live. Click CHANGE, then choose TAB / SYSTEM AUDIO.
- Read the short instruction screen, then click CONTINUE in Audio Visualizers or Video to Laser, or SHARE TAB AUDIO in OSC-1
- In the browser's share dialog, choose the tab that is playing music
- Keep Also share tab audio enabled, then click Share
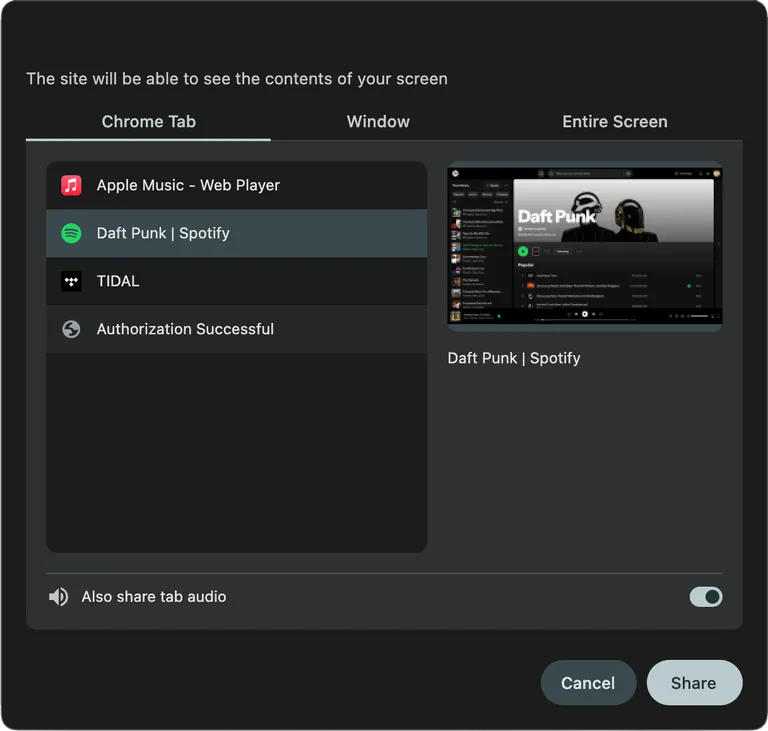
The dialog above is Chrome on macOS; Windows and Microsoft Edge show the same dialog with the same structure.
The panel returns to the summary showing TAB AUDIO — LIVE with a moving level meter.
Keep listening in the original shared tab. BeamTracer analyzes that signal without playing a delayed second copy through its own speakers, and muting BeamTracer's speaker output does not stop the visuals.
Notes:
- Pick a tab, not a window or the full screen — browsers only offer per-tab audio with the Also share tab audio toggle
- On Windows, choosing Entire screen can carry system-wide audio instead — the toggle there is labeled Also share system audio
- Stop with DISCONNECT in the panel, or the browser's own "Stop sharing" bar
- Tab capture is available in Chrome and Edge
Streaming or recording what you visualize? See Streaming with OBS, Twitch & YouTube.
Internet Radio Streams
No microphone and no files handy? Choose INTERNET RADIO in the source chooser:
- Pick one of the curated stations (courtesy of Nightride FM and Radio Paradise, listener-supported radio) and click CONNECT
- Or choose CUSTOM STREAM URL…, paste a direct HTTPS audio stream address, and connect — Spotify or YouTube links will not work
While a station plays, the summary shows its name with a LIVE badge and elapsed time (live streams are not seekable), and STOP ends it. Custom URLs must use HTTPS — an http:// address is rejected with a visible message. A station also has to permit browser audio analysis. If it plays but cannot drive the visualizer, the warning offers OPEN ... IN A TAB and SHARE TAB AUDIO so you can capture the station from a browser tab instead.
Supported Audio Sources
| Source | Works In |
|---|---|
| Tab / system audio capture | Audio Visualizers, Video to Laser Live, and OSC-1 (Chrome, Edge) |
| Demo Track | Audio Visualizers, Video to Laser Live, and OSC-1 |
| Internet radio streams (HTTPS) | Audio Visualizers and Video to Laser Live |
| Audio File | Audio Visualizers, Video to Laser Live, and OSC-1 |
| Browser microphone (built-in) | Audio Visualizers, Video to Laser Live, and OSC-1 |
| External microphone or USB audio interface | Audio Visualizers, Video to Laser Live, and OSC-1 |
| DAW output via a Virtual Audio Device | Audio Visualizers, Video to Laser Live, and OSC-1 |
Selecting Your Audio Input
Where the device selector lives depends on the app:
- Audio Visualizers: open Settings → Audio → CHANGE → MICROPHONE. Enable the input and pick your device from the dropdown (REFRESH re-scans after plugging in hardware).
- Video to Laser Live: open Settings → Audio → CHANGE → MICROPHONE. Enable the input, choose AUDIO INPUT DEVICE, and use REFRESH after connecting new hardware. Choose VIRTUAL AUDIO DEVICE instead when you want the dedicated advanced setup screen.
- OSC-1 Oscilloscope: open Settings → Audio → CHANGE → MICROPHONE, then click ENABLE INPUT (this grants browser microphone permission). A device dropdown then appears — OSC-1 auto-selects a Loopback/BlackHole virtual device when it finds one.
There is no Apply button — selecting a device switches the audio source instantly.
Why your interface or virtual device is listed under "Microphone"
The browser reports every audio input — built-in mics, USB interfaces, and virtual devices such as BlackHole — as a "microphone" input. That is why granting the microphone permission is what reveals the full device list with real names, and why a virtual cable or audio interface appears in the same dropdown as your mic. Selecting it there is expected, not a misconfiguration.
External Audio Interfaces
A USB audio interface (Focusrite Scarlett, Universal Audio Volt, Roland UA series, etc.) appears as an audio input device in the browser.
- Connect your interface before opening the browser
- On macOS: System Settings → Privacy & Security → Microphone → grant Chrome access
- On Windows: The interface appears automatically in the Windows sound control panel → Recording devices
- In the BeamTracer app: open the audio device selector (see Selecting Your Audio Input above) → select your interface
Low-latency settings: For OSC-1's real-time XY display, set your audio interface buffer size to 64 or 128 samples in your interface's control panel. This reduces the lag between playing and seeing the visual response.
Advanced: DAW Routing via a Virtual Device
For everyday listening, tab audio capture needs no setup. A virtual audio device is the advanced path — use it when the sound comes from a DAW, mixer, or another desktop app rather than a browser tab. In Audio Visualizers, Video to Laser Live, and OSC-1, the VIRTUAL AUDIO DEVICE card in the source chooser walks through it.
To send audio from a DAW (Ableton, Logic, FL Studio) to BeamTracer:
macOS — BlackHole or Loopback
Install BlackHole (free) or Loopback (paid) to create a virtual audio device:
- Install BlackHole from existential.audio/blackhole
- In your DAW: set the Master Output to BlackHole
- In BeamTracer: open the audio device selector → select BlackHole (OSC-1 auto-selects it when detected)
Windows — VB-Cable
Install VB-Audio VB-Cable (free virtual audio cable):
- Download and install from vb-audio.com
- In your DAW: set the Master Output to CABLE Input
- In BeamTracer: open the audio device selector → select CABLE Output
Microphone Input — Quality Tips
For the best visual reactivity from a microphone:
- Use a cardioid microphone pointed directly at the sound source
- Keep the microphone 15–30cm from the source (instruments, speakers)
- Avoid room reverb — it muddies the frequency analysis
- Set input gain in OS settings so the signal peaks at -6dBFS, not at maximum
Troubleshooting No Signal
- Check the microphone permission (icon left of the address bar → allow microphone)
- Verify the correct device is selected in the app's audio device selector (Viz: Settings → Audio → CHANGE → MICROPHONE; Video to Laser Live: Settings → Audio → CHANGE → MICROPHONE; OSC-1: Settings → Audio → MICROPHONE / INTERFACE)
- On macOS: verify Chrome has microphone permission in System Settings → Privacy & Security → Microphone
- Test the input level: in macOS Sound settings, speak and watch the input level meter — if it moves, the OS sees the signal; if BeamTracer still shows nothing, check the app permission specifically
If you previously clicked "Block" on the permission prompt
A denied microphone permission is remembered — the browser will not ask again, so the input just stays silent and the device list shows generic names. To reset it:
- Click the icon to the left of the address bar (a lock or sliders icon)
- Set Microphone to Allow — or use Reset permission — for this site
- Reload the page and enable the input again
The same applies to tab sharing: if sharing was blocked for the site, re-allow it from the same address-bar menu before clicking CONTINUE again.
LaserCube
Drive a Wicked Lasers LaserCube from BeamTracer over your local network — cube settings, first light, color thresholds, point rate, firmware, and what the cube does when the stream stops.
Streaming with OBS, Twitch & YouTube
Send BeamTracer visuals to OBS Studio — chrome-less Browser Source, Stream to OBS (WebRTC), window capture fallback, and stream audio routing.