
Laser Banding Explained: Why Laser Beams Look Wavy or Broken on Camera
Laser banding is the wavy, bent or broken look laser beams take on camera. A camera exposes each frame for only part of the time the laser takes to redraw its drawing, and a rolling shutter reads the sensor row by row, so each frame records a different slice of the scan. To control it, match the laser's redraw rate to the camera's frame rate. In BeamTracer, that is the FRAME RATE slider under LASER OUTPUT.
Hi, I'm Trina with BeamTracer.com — in this one we'll take apart an effect you have seen in music videos and on stage cams: laser beams that ripple, bend, or hang in the air on the recording while, to everyone in the room, they look perfectly normal. It is a camera effect, it follows a small amount of arithmetic, and once you know the numbers you can make it happen on purpose, or make it go away.
Illustration: the same beams that look like solid lines in the room come out broken into segments on a rolling-shutter camera.
What is laser banding?
Laser banding is a camera-only effect where a scanned laser drawing appears as broken bands, bent beams or a slowly moving ribbon on video, while the eye sees a steady shape. It is used deliberately in music videos and live broadcasts, and it is the same thing people complain about as "flicker" or "dark bands" when they film a show. The International Laser Display Association added laser banding to its awards as a recognized effect in 2023, listing it with bounce mirrors and gratings as an add-on effect.
A laser projector draws with one beam and two mirrors. Every shape you see is the beam tracing the outline over and over, thousands of points a second. Your eye blends the passes into a solid figure. A camera does not blend the same way: it opens the shutter for a set time, reads the sensor, and repeats. What ends up in each frame is only the part of the drawing the beam traced while that shutter was open — and on most cameras, that part differs from the top of the frame to the bottom.
Banding is not the same as the grainy, shimmering texture a laser spot has on a wall. That is laser speckle, an interference effect of coherent light, and it shows up to the eye as well as on camera.
Why do laser beams look wavy on camera but not to the eye?
Because the eye keeps integrating light while a camera samples it. A laser's mirrors move at tens of thousands of points per second, so the eye, which smooths out anything that repeats more than a few dozen times a second, sees a whole shape. A camera's shutter is open for a fixed fraction of a second and sees only the piece of the drawing traced during that time.
Two camera facts decide what that piece looks like:
- Shutter time. At 25 fps with a shutter of 1/50 s, each frame is exposed for 20 ms. If the laser redraws the shape 25 times a second, one redraw takes 40 ms, so the frame captures half of the drawing. Shorten the shutter to 1/100 s and the frame captures a quarter of it.
- Rolling readout. Most video cameras and every phone use a rolling shutter: the sensor is exposed and read row by row from top to bottom, so each row starts a little later than the row above. The rows near the top of the picture catch one part of the scan, the rows near the bottom catch a later part. A beam that crosses the picture is recorded in pieces that were drawn at different moments, which is why it bends, staggers or splits into segments.
A global-shutter camera exposes the whole sensor at the same instant. It still records only the slice of the drawing traced during the shutter time, so the shape can look incomplete, but every row saw the same slice, so the pieces line up instead of bending.
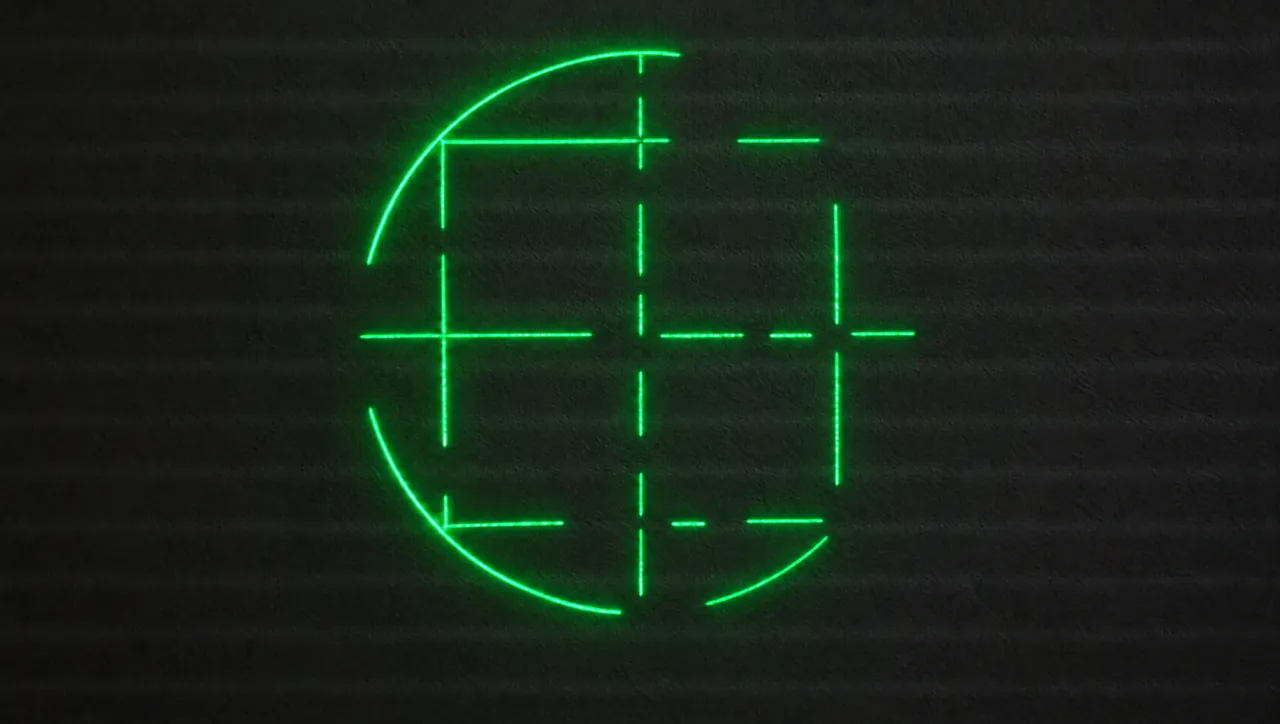
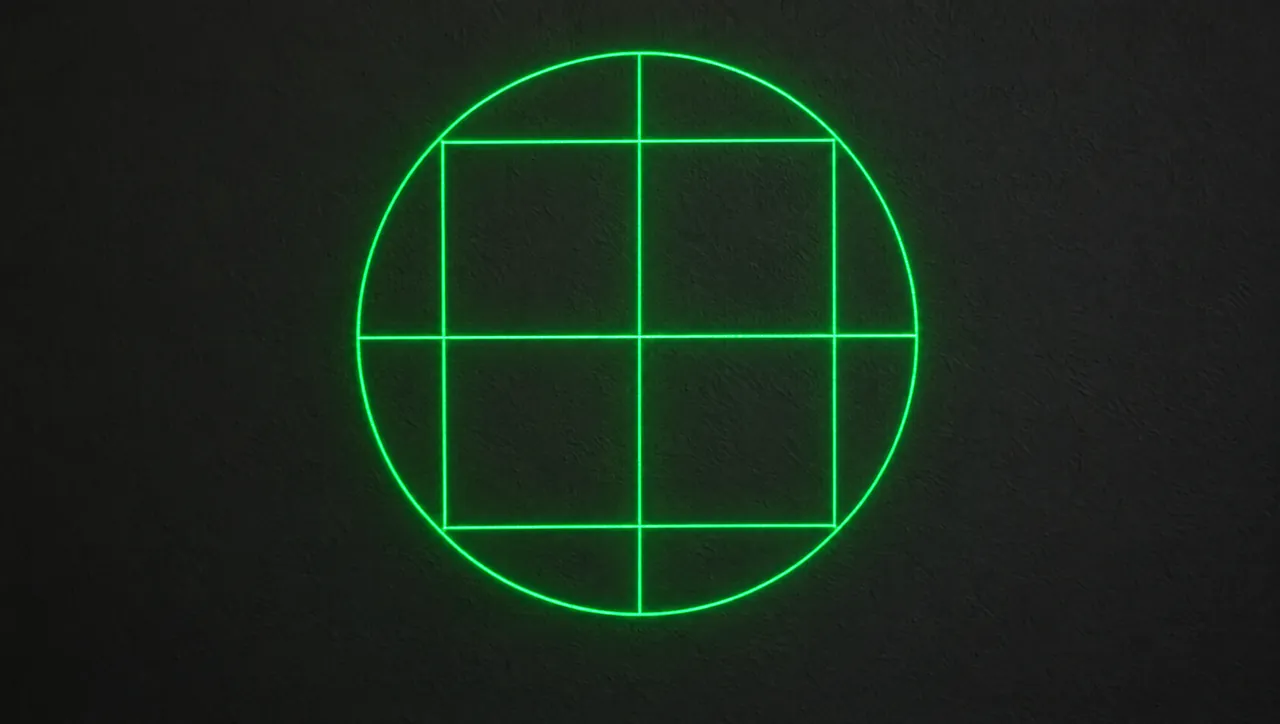 What the eye seesWhat a 25 fps, 1/50 s camera records
The LED wall version of the same thing
If you have ever filmed an LED wall or a monitor and seen dark bands roll through it, that is the same mechanism: a light source that refreshes faster than the eye can follow, read by a sensor one row at a time. The usual fix there is a shutter time that lasts a whole number of the screen's refresh periods, which is the same idea as matching a laser's redraw rate.
What decides whether the bands freeze or drift?
One relationship: the laser's redraw rate against the camera's frame rate. The laser redraws a frame as often as the point rate allows:
redraw rate (redraws per second) = point rate (points per second) ÷ points in the frame
MadMapper's MadLaser guide states the same relationship as its ILDA FPS: 30,000 points per second over a 500-point frame is 60 redraws a second. A 1,200-point frame at 30,000 points per second redraws 25 times a second, and each redraw takes 40 ms. The camera then samples that at its own rate. What you see depends on the ratio:
| Laser redraw rate | Camera | Each camera frame catches | On the recording |
|---|---|---|---|
| 25 redraws/s | 25 fps, 1/50 s | The same half of the scan every frame | The bands hold still |
| 25 redraws/s | 25 fps, 1/100 s | The same quarter of the scan every frame | Thinner, sharper bands |
| 26 redraws/s | 25 fps, 1/50 s | A slice that starts 4% further into the scan each frame | The bands crawl forwards, one full lap a second |
| 24 redraws/s | 25 fps, 1/50 s | A slice that starts 4% earlier each frame | The bands crawl backwards |
| 50 redraws/s | 25 fps, 1/50 s | One whole redraw | The full figure, no bands; shorten the shutter to 1/100 s to see them again |
The rule of thumb: an exact whole-number relation between the redraw rate and the frame rate (the same, double, half) freezes the pattern, because every camera frame lands on the same part of the scan. A small mismatch makes the pattern drift, because each frame lands a little later or earlier in the scan than the last, and the direction of the drift tells you which way you are off. A large mismatch looks like random flicker, which is the complaint most people start with.
The worked numbers, so you can do your own:
- Find the redraw rate. 30,000 points per second ÷ 1,200 points = 25 redraws per second.
- Find the camera's frame period. 25 fps is 40 ms per frame; 30 fps is 33.3 ms.
- Compare. 25 redraws a second at 25 fps is exactly one redraw per camera frame, so the bands freeze. At 26 redraws a second each frame starts 0.04 of a scan further on, so the pattern laps the drawing once every 25 frames: once a second.
- Choose the slice with the shutter. 1/50 s at 25 fps is half the frame period (the film convention of a 180° shutter), so half a redraw lands in each frame. 1/100 s halves the slice again.
Freezing the bands completely is harder than the arithmetic suggests. In Wicked Lasers and MadMapper's laser banding tutorial, shot at 25 fps and 1/50 s on a LaserCube Ultra, the scan speed is tuned per pattern until the banding looks right, a 1/100 s shutter gives thinner beams, and the best they get when trying to stop the bands is a very slow crawl. A slow crawl is the look most people want anyway.
How do I find a laser file's redraw rate in BeamTracer?
Open the file in the free ILDA Viewer and read FILE HEALTH. For a single-frame file it reports the redraw rate directly at the point rate you choose under DEVICE: the ILDA test pattern that loads from PATTERN has 1,191 points, so it reads Redraws 25 times/sec at 30 kpps. For an animation it reports the point rate the file Required at the playback FPS instead.
- Open the ILDA Viewer in Chrome or Edge.
- Drop your
.ildfile on CLICK OR DRAG ILDA FILE HERE, or click PATTERN under TEST SUITE to load the ILDA test pattern. - Under FILE HEALTH, set DEVICE to the point rate your projector will run at: Standard 30k, High-Speed 60k, or Custom with a CUSTOM MAX KPPS value.
- Read the line under DEVICE. A still frame reads Redraws N times/sec at K kpps; an animation reads Required: X kpps @ Y FPS.
- Change DEVICE and watch the number move: the same 1,191-point pattern redraws 25 times a second at 30 kpps and 50 times a second at 60 kpps.
- For an animation, set the playback FPS (10 / 20 / 24 / 25 / 30 / 50 / 60) to the rate you will play it at, so Required matches your show.
- Click EXPORT ILDA to save a copy for a show player as ILDA Format 0, 1 or 5.
That line is what the projector does with the file as stored: the point count divided by the point rate. 25 redraws a second is a convenient coincidence for this post, because it is also the frame rate of a 25 fps camera, so the test pattern is a ready-made banding target.
For the eye, the same number decides flicker. Switch on STABILITY (Settings gear → ADVANCED → STABILITY) and a section under FILE HEALTH rates how likely the current frame is to flicker at the chosen DEVICE rate. Flicker to the eye and banding on camera are two sides of one number.
The test pattern is a good banding target
The ILDA test pattern has a circle, a square and straight lines in one frame, which makes bending easy to see and easy to compare between takes. Load it with PATTERN under TEST SUITE before you try your own artwork.
How do I match the laser's redraw rate to my camera in BeamTracer?
Set FRAME RATE under LASER OUTPUT to your camera's frame rate. FRAME RATE is how many times a second BeamTracer sends the frame to the laser, and each frame gets a budget of point rate ÷ frame rate points, so it is the redraw rate you control. Set it equal to the camera's frame rate to freeze the bands, one step away to make them drift, and shorten the camera's shutter to thin them.
- Open the ILDA Viewer in Chrome or Edge and click PATTERN under TEST SUITE, or load your own
.ildfile. - Set the camera first: manual exposure, 25 fps and a shutter of 1/50 s (or 30 fps and 1/60 s), with every auto mode off so the shutter time cannot change between frames.
- Open LASER OUTPUT at the bottom of the right-hand PROPERTIES sidebar and, under DEVICE, pick SIMULATOR and click CONNECT SIMULATOR to rehearse with no hardware, or pick your DAC: HELIOS over USB, ETHER DREAM or LASERCUBE through the BeamTracer Bridge.
- With the beam terminated on a wall or screen and nobody in its path, press ARM, then CONFIRM ARM, then START.
- Set FRAME RATE to your camera's frame rate, 25 fps, and watch the bands on the camera's monitor settle.
- Move FRAME RATE to 24 or 26 fps and watch the bands crawl; the closer to 25, the slower the drift.
- Shorten the camera's shutter to 1/100 s or 1/200 s for thinner, more defined bands.
- Click EXPORT ILDA to keep the file for a show player, and write down the point rate and frame rate beside it.
The same LASER OUTPUT panel, with the same FRAME RATE slider, is in every BeamTracer laser tool that sends frames: the ILDA Viewer, Text to Laser, Image to Laser and Animation Studio. In the ILDA Viewer it is the same rate the playback controls use; in Animation Studio it snaps to 24, 25, 30, 48 or 60 fps.
Two things to know before you trust the number on the wall. The point budget is a ceiling: a frame with more points than point rate ÷ frame rate is simplified to fit, so a dense logo at 60 fps on a 30K scanner loses detail. And the drawing on your camera is the result of the projector, the DAC and the camera together, so treat the slider as the place to start and the camera monitor as the judge.
An ILDA file stores no point rate and no frame rate
The redraw rate you tuned in BeamTracer is a property of the output, not of the file. Play the
same .ild in a standalone player at another point rate and the bands change with it. Note the
point rate and frame rate beside the file, and set the player to the same values.
Does this work with a LaserCube, an Ether Dream or a Helios?
Yes, with the same FRAME RATE slider, because every BeamTracer laser tool drives every DAC through one LASER OUTPUT panel. What differs is how far each device lets you push the point rate.
- LaserCube. Connects through the BeamTracer Bridge. The Ultra Mk2 runs up to 35,000 points per second and clamps anything higher, so treat it as a 30K-class projector and tune with FRAME RATE. Wicked Lasers markets laser banding as an Ultra Mk2 use case, syncing the laser's refresh rate with the camera; in BeamTracer that sync is FRAME RATE.
- Ether Dream. Connects through the Bridge over your local network. One MadMapper user reported capturing laser-on-water shots in 4K at up to 120 fps on an Ether Dream by tuning the desired frame rate and the DAC's point rate together, so that one full scan matched the camera's shutter time, and only when the full logo was not being drawn. Simple shapes give you the most room.
- Helios. Connects directly over USB in Chrome or Edge with nothing installed.
The DAC Simulator is free on every plan and needs no hardware, so you can rehearse the FRAME RATE changes before a projector is involved.
Filming a laser is still a laser show
The beam that looks harmless on a monitor is the same beam that can cause permanent eye injury in a fraction of a second. Keep beams at least 3.0 m above any surface people can stand on and 2.5 m to the side of anywhere they can be (the US variance condition), terminate every beam on a surface that stops it, never aim at the audience, the crew or a camera lens, keep an E-stop within reach, and start at a low POWER LIMIT. The laser show safety guide covers the US rules in full.
Can filming a laser damage my camera?
Yes: a camera sensor is more easily damaged than an eye, and the risk is highest when the whole beam goes straight into the lens. The International Laser Display Association's page on laser damage to cameras recommends shooting beams in mid-air or on a screen, where the full power is not entering the lens. For banding shots that is also the better picture: film the beams through haze or the drawing on a wall, with the camera out of the scan area and the laser never pointed at it.
What camera settings should I start with?
Start with manual exposure at the frame rate you will deliver, a shutter of half the frame period, and change one thing at a time.
| Setting | Start here | Then |
|---|---|---|
| Frame rate | 25 fps (or 30 fps) | Keep it fixed; tune the laser to the camera, not the other way round |
| Shutter | 1/50 s at 25 fps, 1/60 s at 30 fps | 1/100 s or 1/200 s for thinner bands; the frame gets darker, so open the aperture or raise ISO |
| Exposure mode | Manual, auto ISO off | A shutter that changes between frames changes the bands between frames |
| Shutter type | Rolling shutter for the bending look | A global-shutter camera gives straight, aligned slices instead |
| Laser redraw rate | FRAME RATE equal to the camera's frame rate | ±1 fps for drift |
| Laser point rate | Your projector's rating | A higher point rate redraws the same drawing more often, so check FILE HEALTH again |
Can I get laser banding on a phone?
Yes, and phones band readily, because nearly every phone camera uses a rolling shutter. The catch is that the default camera app picks the shutter time for you and changes it with the light, so the bands change from moment to moment. Use a camera app with manual shutter control, or lock the phone to a fixed 24, 25 or 30 fps mode, then tune FRAME RATE to whatever frame rate the phone settled on. Still photos work the same way: a short shutter catches a slice of the scan, a long exposure catches the whole drawing.
Can I use laser banding as an effect?
Yes: that is where the look comes from. Set the redraw rate a fraction away from the camera's frame rate and the bands crawl along the beam like a ribbon; freeze it and a scanned circle sits on the recording as a set of broken arcs that never quite close. Keep the shapes simple so the bands read clearly, and write down the frame rate, point rate and shutter that gave the look, because it will not survive a change to any of them.
Illustration: a frozen banding pattern turns one scanned drawing into a set of arcs and dashes that hold still on the recording.
| Approach | What you control | What you see on camera |
|---|---|---|
| BeamTracer FRAME RATE under LASER OUTPUT | The redraw rate in 1 fps steps | Bands frozen at an exact match, drifting at a near match |
| MadMapper's MadLaser | Desired FPS as a target; ILDA FPS shows the real redraw rate, PPS ÷ point count | The same math, tuned per laser surface |
| Camera only | Shutter time and frame rate | Thinner or thicker slices; drift only if the laser side is already close |
Is the ILDA Viewer free, and do I need to install anything?
The ILDA Viewer is free for everyone and needs no account, and it runs in a Chrome or Edge tab with nothing installed. FILE HEALTH, DEVICE and the DAC Simulator are free on every plan, so the whole redraw-rate check can be done before you own a projector. Output to real hardware is a Studio feature, and every account gets three free output sessions to try it; saving a copy with EXPORT ILDA is a Studio feature too, with three clean exports a month on other plans. Current plans are on Pricing.
Check a laser file's redraw rate in your browser — free, no install
OPEN THE ILDA VIEWER →Next: Laser Blanking Explained for the other thing a camera exaggerates, the LaserCube point rate guide if the cube is your projector, Laser DAC Output for every control in the panel, and the Laser Show Safety Guide before the first beam leaves the lens.
That's laser banding. beamtracer.com — I'll see you in the next one.