
3D Import Settings
Every control for tracing a 3D model on the XY oscilloscope — edge modes, hidden-line removal, edge threshold, mesh detail, and the real-hardware scan limits.
Import a 3D model and OSC-1 traces its edges as an XY beam path. This page covers every control in the 3D Import panel and what each one does to the drawing.
For a walkthrough of the workflow, see 3D Import in Shape Tools. For sending the result to a projector, see Hardware.
Choosing what to trace
Start with a built-in shape
The six built-in shapes need no file and load instantly, which makes them the fastest way to learn what each setting does before you import your own model.
| Shape | Why it is there |
|---|---|
| Cube | Hard creases. The classic isometric line-drawing test. |
| Cone | Four-sided cone — a simple mix of creases and outline. |
| Sphere | Smooth ball. Its outline is a silhouette, not a mesh edge, so it shows what Edge Mode is for. |
| Torus | Ring — the one single shape that hides part of itself. |
| Trio | Three separate spheres that overlap on screen. |
| Blocks | Three separate boxes at different depths. |
Trio and Blocks are arrangements of separate objects, so one passes behind another. They are the clearest way to see what Hide Hidden Lines does — on a single solid shape the difference is often invisible.
Preset models are ready-made and load facing the camera at a crease angle
chosen for each one. Import File takes a self-contained .glb, or a .gltf
and its .bin selected together. If the GLTF keeps those files in a model
folder, use Import GLTF Folder and choose the whole folder. Materials do not
affect the XY wire-frame, so a missing texture does not prevent the geometry
from loading.
3D import limits
OSC-1 accepts glTF 2.0 model data up to 78.6 MB, with a maximum 8 MiB GLTF
description. A folder selection can contain up to 26 entries. Unrelated files
in that folder are ignored, but they still count toward the folder-entry limit;
for a larger download, select only the .gltf and its required .bin files. Remote
buffer links are not loaded. Very large models are stopped before import at one
million positioned vertices or two million triangles, with an error instead of
attempting to open them.
For the smallest, most reliable import, choose a self-contained .glb. If the
model is a .gltf package, select only the .gltf and the .bin files it
requires. Use Import GLTF Folder when you do not know which companion files
are required; textures, preview images, source-project files, videos, and license
documents are not needed for the XY wire-frame.
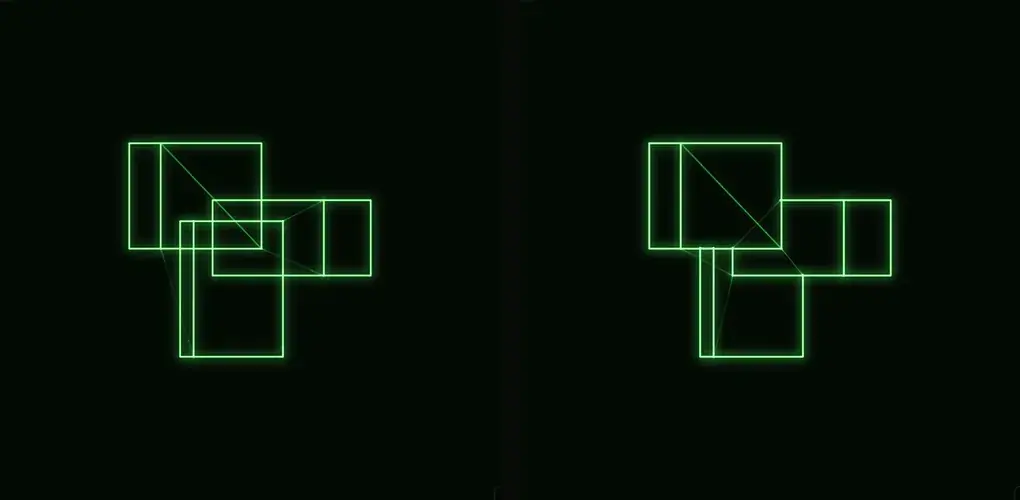
Hide Hidden Lines
On by default. The trace draws the model as a solid object — edges that sit behind nearer geometry are left out, the way you would draw it by hand. Turn it off for a see-through wire-frame look, where every edge is drawn whether or not you could see it.
Two things to know:
- It usually costs nothing to leave on. On a single convex shape — a sphere, a cone, a cube seen head-on — there is nothing to hide, and the drawing is identical either way.
- It substantially reduces scan load on anything complex, because the lines you cannot see are no longer drawn. On a detailed model this is often the difference between a trace a real device can draw and one it cannot.
Edge Mode
Which edges get traced at all.
| Mode | What it draws | Use it when |
|---|---|---|
| Auto (default) | Outline plus creases, falling back to all edges if none are found | Almost always — it is the hand-drawn look |
| Feature | Outline plus creases | Same as Auto, without the fallback |
| Sharp Edges Only | Angle-based creases only | Hard-surface models where you want no outline |
| Wireframe | Every triangle edge | Inspecting mesh structure — see the note below |
| Silhouette | Outer contour only | A clean profile with no interior detail |
Wireframe is very heavy
Wireframe draws every triangle in the mesh, which on a detailed model is tens of thousands of segments — far beyond what any scope or projector can draw per refresh. It is genuinely useful for inspection, but lower Mesh Detail to around 25% first, or the result is a dense scribble. Mesh Detail is the control that matters here; Edge Threshold does nothing in this mode.
Edge Threshold
How sharp a fold has to be before it counts as a crease, from 1° to 90°.
- Lower finds more interior detail — panel lines, seams, subtle folds.
- Higher keeps only the strongest creases and draws less.
The default is 30°, which suits most models. Smooth models need a lower value. If an imported model traces as a bare outline with nothing inside it, its surfaces meet at shallower angles than 30° and no crease is being found — drop the threshold to 15° or 10° and the interior detail appears.
This is the main lever on how much you draw in Auto, Feature and Sharp modes.
Lowering Mesh Detail will not reduce the point count here
It is natural to reach for Mesh Detail to make a trace lighter, and in Auto, Feature and Sharp modes it does the opposite — simplifying a mesh makes its remaining faces meet at sharper angles, so more edges pass the crease test. Use Edge Threshold instead. Mesh Detail only reduces the trace in Wireframe.
Mesh Detail
Simplifies the mesh itself, from 5% to 100% of its original vertices.
Its real use is Wireframe mode, where the number of edges follows the number of triangles directly. In every other mode, see the callout above.
Path Optimization
PATH OPTIMIZATION is the section under the model list in the 3D Import panel. It also holds Hide Hidden Lines, Edge Mode, Edge Threshold and Mesh Detail; the path controls are at the bottom.
| Control | What it does |
|---|---|
| Path Optimization | Orders the strokes so the beam travels the shortest distance between them. Leave it on. |
| Blanking Points | How many beam-off points are inserted at each jump. More gives the beam longer to travel dark; fewer saves scan budget. |
| Jump Threshold | How far apart two points must be before the move counts as a jump rather than a line. |
| Trace Speed | How many refreshes the whole path is spread across. Faster redraws the whole shape more often; slower draws it more smoothly. |
| Reprocess Path | Re-runs the path with the current settings. |
View controls
Rotation X / Y / Z and Zoom frame the model; Auto Rotate spins it continuously with an adjustable speed and direction. Reset View returns rotation to zero and zoom to 1× — and zero always means facing the camera, so a model that loads front-on stays front-on after a reset.
3D PREVIEW ON replaces the trace with a view of the model's mesh so you can frame it; click it again to switch the preview off and return to the traced output. The preview uses the same size and orientation the trace will draw.
Embedded animation
The Animation header includes the loaded model name, so you can confirm which file the clip controls belong to before starting playback. When a GLTF or GLB contains animation clips, the section adds:
| Control | What it does |
|---|---|
| Embedded Clip | Selects one of the animations stored in the file. |
| Play Clip / Pause Clip | Starts or holds the selected clip at its current pose. |
| Stop Clip | Stops playback and returns to the first pose. |
| Clip Speed | Runs the clip from 0.10× to 4.00× speed. |
| Playback Mode | Plays once, loops from the beginning, or alternates forward and backward. |
| Clip Time | Scrubs to an exact pose and shows the current and total time. |
| Export Loops | Chooses how many complete clip cycles the WAV or video contains. |
| Export Length | Shows the exact derived length from the clip, speed, playback mode, and loop count. |
You do not have to guess an export duration for an embedded clip. At 1.00×, one Loop pass of a 2.375-second walk cycle exports exactly 2.375 seconds; choose more Export Loops to repeat the complete cycle. In Ping-Pong mode, one loop includes both the forward and return passes.
The M buttons map clip selection, play/pause, speed, playback mode, and clip time to a MIDI control or an OSC address. Auto Rotate remains a separate view control, so you can animate the model and rotate the camera framing independently.
Files without embedded clips keep the static 3D workflow and the Spin, Bounce, and Tumble transform presets.
Animated-file quick start
Which file should I upload? Choose a .glb when the download includes one;
it is normally the complete model in a single file. Otherwise, use Import
GLTF Folder and choose the folder containing the .gltf, .bin, and any
other companion files. You can also use Import File and select the .gltf
and .bin together. OSC-1 does not import .obj, .blend, or .fbx files directly.
The model must contain at least one embedded animation clip. A model described as rigged may only contain a skeleton and still have no animation, so look for downloads described as animated or confirm that animation clips were included when exporting from Blender.
How do I start the animation?
- Import the animated GLB or GLTF package and wait for the model information to appear.
- Scroll to Animation and choose an Embedded Clip.
- Press Play Clip.
- Use Clip Speed, Playback Mode, or Clip Time to change playback or scrub to a pose.
To save the motion as XY audio, open Export → 3D→XY, choose Clip Loops, and press Export 3D→WAV. The export shows progress while each animated pose is traced, and the finished WAV can be loaded back into OSC-1 as an audio file.
If Animation has no embedded clips, the imported model is static. Re-export the model with its animation clips included, or choose a different animated GLB/GLTF file.
Real-hardware limits
Under the model information, OSC-1 shows what your trace costs against two real ceilings, computed from your live settings rather than assumed:
| Device | Limit | Why |
|---|---|---|
| Oscilloscope | sample rate ÷ frame rate — 1,600 points at 48 kHz and 30 fps | The beam is the audio signal, so one point costs one sample. A higher sample rate raises it proportionally. |
| Laser | 1,000 points at 30 kpps and 30 fps | An ILDA projector is rated in points per second and its galvos are mechanical. |
If the trace is over either limit the readout says by how much, and suggests the control that will actually help for your current Edge Mode. On screen an over-budget trace simply dims and flickers; on real hardware it is a hard ceiling, which is why both are stated rather than hidden.
If you are over budget
In Auto, Feature or Sharp mode, raise Edge Threshold. In Wireframe, lower Mesh Detail. In any mode you can also raise Trace Speed to spread the path across more refreshes — there the ceiling is your audio hardware.
Sending it to a laser
Open Laser Output, choose a DAC, and press Start. Two controls matter for 3D content:
- Output scale sits in the panel's OUTPUT section and sets how much of the full scan angle the beam uses, from 25% to 100%. OSC-1 starts at 80% until you set it. A source already at full scale plus anything played over it goes past the edge of the field, and those points are blanked — visible as notches in the figure. If you see notches, lower it to leave room. Once you set it, the same value applies in every laser tool.
- Point Rate is what your projector is rated for. If the output exceeds it the panel says by how much and names the levers, because blanking adds points for beam travel after the rate is applied — a drawing with many separate strokes can cost more in travel than in artwork.
See Hardware for connecting a DAC, and Laser safety before projecting into any space with people in it.
Tips
- Low-poly models work best. High-poly meshes produce thousands of segments and very high scan load.
- Center your model at the origin before exporting it.
- A bare outline means the threshold is too high, not that the import failed.
- Try Trio or Blocks to see hidden-line removal clearly before judging it on your own model.
- A symmetrical model seen head-on can hide edges without looking any different. Rotate it a little and the difference appears.
- Trace Speed is audible. A lower drawing rate is a lower pitch, so raising it to sharpen the image also raises the tone.
Related
- Converting a 3D model to oscilloscope or laser art — the illustrated version, start to finish
- Animated GLTF to XY audio and laser art — animation clips, loops, and the WAV export
- Hidden line removal makes your 3D model sound better — why fewer edges is more light
- How to draw two things at once — what Trio and Blocks are demonstrating