
How Do I Make Laser Artwork Follow a Motion Path?
To animate laser artwork along a motion path, import an SVG into BeamTracer Animation Studio, select its layer, and open ANIMATION → MOTION PATH. Choose Figure 8 or another preset, set the layer’s duration, and use Auto-Orient to turn with the path. Download the ILDA animation and reopen it in ILDA Viewer.
Figure 8, six seconds, 30 FPS, Linear easing, Auto-Orient on. The flat Viewer playback makes position and rotation easier to compare than an orbiting camera does.
What artwork works well on a moving path?
Use a drawing whose direction you can recognize. A koi, arrow or vehicle makes Auto-Orient easy to judge because you can see which way it faces. A perfectly symmetric circle hides that difference.
Download the original Prism Koi SVG to follow this example. It uses cyan outlines, pink fins and gold accents. The file has vector paths and source colors, so it can remain a multicolor drawing after import.
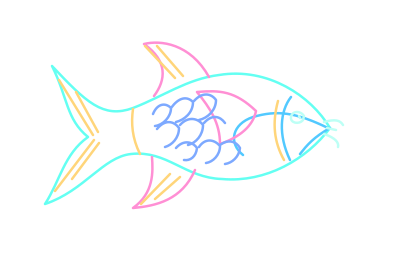
Keep enough space around the drawing for its journey. A large picture near an edge can leave the canvas as it turns. For this koi, use a Scale width of 32 with the aspect ratio linked before applying the path.
How do I send the drawing around a Figure 8?
- Open Animation Studio and load the SVG in SOURCE.
- Select its layer. Under PROPERTIES → TRANSFORMS, double-click the W value in Scale, enter 32, and keep the aspect-ratio link on.
- Open ANIMATION, expand MOTION PATH, and choose Figure 8.
- Set Layer Duration (s) to 6. Keep the layer at the start of the timeline and FPS: 30.
- Keep Path Easing: Linear, Auto-Orient (rotate to face direction) on, Offset: 0°, and Loop Animation on.
- Press the timeline’s Play button. Inspect the full journey, then choose DOWNLOAD ILDA.
- Load the saved
.ildin ILDA Viewer, set Playback FPS: 30 and Beat sync: Off, and play it again.
Layer Duration sets the time available for this trip. Increasing it slows the drawing’s travel over the same path. FPS sets the number of animation frames per second; it is separate from the scanner’s point rate. The six-second example contains 180 animation frames.
How do I keep the picture upright instead?
Turn off Auto-Orient (rotate to face direction). The drawing follows the same path while keeping its layer rotation. This is useful for words or logos that need to remain upright.
The path, artwork and six-second timing are unchanged. Only Auto-Orient is off.
With Auto-Orient on, Offset corrects the artwork’s forward direction. If an imported drawing points upward while the path assumes a different forward axis, try a 90° offset and inspect the whole loop. A fixed offset also changes the drawing’s angle through every turn.
How do I make the movement ease into an arc?
Choose Arc under Path Presets. It creates an open curved journey from the layer’s starting position. Use Path Easing → Ease In-Out to slow near the beginning and end. Leave Loop Animation off for a single pass.
Arc with Ease In-Out and Auto-Orient on, over the same six-second layer duration. The demonstration player repeats the saved clip; its end-to-start reset is separate from the path’s single pass.
Use Linear easing when you want to judge the path’s motion without an added easing curve. The panel also has Back, Bounce and Elastic timing choices. Try a short preview before committing to one: overshoot or a pause can change whether the drawing stays readable near an edge.
The available path presets are Linear, Arc, Circle, Figure 8, Wave and Bounce. Their small Path Preview shows the route. These are preset paths; you cannot reshape them by dragging their points on the main canvas. For individually authored positions and rotation, use the Animation Studio keyframe controls.
How do I check the saved animation in Cinema?
Reopen the downloaded file in ILDA Viewer rather than judging only the editing canvas. You can also download the finished Figure 8 ILDA sample and compare it with your export. Confirm its frame count, playback speed, colors and full travel. The ILDA file-health tutorial explains the next checks if the drawing changes unexpectedly after export.
Switch the Viewer to 3D, open SCENE, choose Cinema, and select Orbit Mode in the camera menu. Drag to adjust the starting angle and zoom with the wheel; the Cinema view also has Lights off. The Cinema clip shows that view of the same Figure 8 export. An orbit helps you inspect the simulated beam scene; return to 2D to check the drawing’s shape and path without camera movement.
The article’s exported Prism Koi animation, reloaded in ILDA Viewer and shown in Cinema with Orbit Mode. This is a software beam simulation, not footage of a projector or a hardware safety certification.
If you need an outline to draw itself before traveling, the static SVG animation tutorial covers the separate writing workflow. The Animation Studio guide documents paths, keyframes and layer timing. Pricing lists current ILDA export access and allowances.
A clean software preview does not establish safe physical output. Check scanner point budgets and follow the laser safety guide before considering a projector. This tutorial uses no connected laser hardware.
Load the koi or your own SVG and compare a turning path with fixed orientation.
Try Motion Paths in Animation Studio