
How Do I Add Film Grain to a Video in My Browser?
To add film grain to a video, open BeamTracer Performer, load your clip, and add FILM GRAIN. Choose GRAIN TYPE → FILM STOCK, set GRAYSCALE → 1, then use GRAIN 0.45 and GRAIN SIZE 5 px for a coarse black-and-white treatment. The grain changes as the clip plays, and you can render the finished video in the browser.
BeamTracer generates the grain on your picture, so there is no overlay file to download, stretch or repeat for the length of a song. The tonal controls help you keep dark backgrounds clean while adding texture to faces or graphics. Preview the treatment on your clip before committing to an export.
Coarse black-and-white grain: GRAIN 0.45, GRAIN SIZE 5 px and GRAIN RATE 12. SHADOWS and MIDTONES are both 1; HIGHLIGHTS is 0.30. The portrait stays still so you can see the grain change. This demonstration is silent.
How do I add film grain to an uploaded video?
Use FILM STOCK for this recipe, with SCANLINES 0 and PAPER GRAIN OFF. These choices isolate the changing film texture so you can judge it without CRT lines, dust or a paper surface obscuring the difference.
- Open Performer with FILM GRAIN.
- In SOURCE, use VIDEO · IMAGE to load your clip, or choose TRINA for the still portrait shown here.
- In FILM GRAIN, choose GRAIN TYPE → FILM STOCK.
- Set GRAIN → 0.45, SCANLINES → 0 and GRAYSCALE → 1.
- Open FILM STOCK and enter the black-and-white settings in the table below.
- Leave FRAME → FULL and PAPER GRAIN → OFF while you watch the grain change across the picture.
- Click RENDER, choose MP4 · H.264 or WEBM · VP9, set size and frame rate, then click RENDER VIDEO and SAVE VIDEO.
| FILM STOCK control | Black-and-white starting value | What to watch |
|---|---|---|
| GRAIN SIZE | 5.00 px | Coarse texture across skin and flat backgrounds |
| SHADOWS | 1.00 | Strong grain in dark hair and black areas |
| MIDTONES | 1.00 | Texture across the face and gray background |
| HIGHLIGHTS | 0.30 | Whether bright fabric becomes gritty |
| COLOR GRAIN | 0 | Keeps the grain monochrome |
| GRAIN RATE | 12 fps | How often a new grain pattern appears |
| FLICKER | 0 | Keeps exposure variation out of the comparison |
| DUST | 0 /s | Keeps isolated specks out of the comparison |
| FRAME | FULL | Keeps the full picture visible |
GRAIN SIZE uses a 1080-line frame as its reference; other output heights scale the texture proportionally.
The film treatment section of the image-effects guide lists the complete controls, including dust and widescreen framing.
What is film grain, and how is it different from a paper texture?
Film grain is the irregular texture visible in a photographic film image. In motion-picture footage, its pattern changes from frame to frame. A paper texture can stay attached to the same places in a picture, which gives a different impression even when both look rough in a paused frame.
BeamTracer's FILM STOCK changes the grain pattern at GRAIN RATE. Its separate PAPER GRAIN treatment has FROZEN and DRIFT choices for paper texture. Choose the surface you want before increasing the strength; more texture does not by itself make a picture look more photographic.
The values here describe visual treatments, not measurements of a particular film brand or stock. The Cinematools grain guide discusses why tonal distribution and final display size matter when applying digital grain. Use your own footage to decide how much texture belongs in its shadows and highlights.
For a quieter finish, lower GRAIN until the face reads clearly through the texture. Pause on the same expression when comparing settings so a different pose does not distract from the finish.
What is the difference between Grain and Grain Size?
GRAIN sets strength; GRAIN SIZE sets coarseness. The opening recipe uses 0.45 strength and 5 px grain so the texture is visible across the full portrait. Lower GRAIN first if the face becomes hard to read. Lower GRAIN SIZE when you want a finer texture at the same strength.
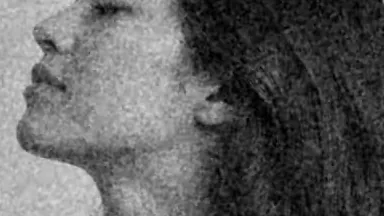
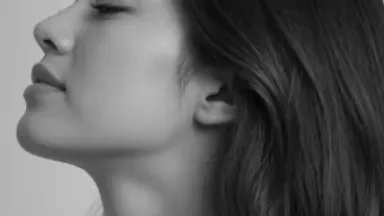 GRAIN 0GRAIN 0.45
How do I make a subtler color finish?
Set GRAYSCALE → 0, GRAIN → 0.12 and GRAIN SIZE → 2 px. Use SHADOWS 0.10, MIDTONES 0.75, HIGHLIGHTS 0.12, COLOR GRAIN 0.10 and GRAIN RATE 24. Keep FLICKER, DUST and SCANLINES at 0, with FRAME set to FULL and PAPER GRAIN OFF.
Fine color grain on SOURCE → TRINA · HANDS. This lighter treatment is easier to judge at full size: watch the gray background and skin while the hands move.
Use this recipe when the clip needs a light finish and the grain should stay behind the performance. Compare it with GRAIN 0 at the size your audience will watch. If compression removes the texture, raise GRAIN slightly and inspect a short export again.
How do I keep grain out of the darkest areas?
Lower SHADOWS while leaving the grain amount and midtone settings unchanged. The weights blend across tones, so you can make the hair quieter while retaining texture across the face and background.
The opening black-and-white recipe with SHADOWS reduced from 1 to 0. GRAIN stays at 0.45, GRAIN SIZE at 5 px, MIDTONES at 1 and HIGHLIGHTS at 0.30.
Check a dark edge against a midtone, such as hair against a gray background. If both look equally rough, reduce SHADOWS first. If the entire picture is too noisy, reduce GRAIN instead. Lower HIGHLIGHTS when a pale shirt or bright graphic becomes distracting.
When finishing a music visualizer, start with low SHADOWS so dark negative space stays quieter while the lit shapes carry texture. Add FILM GRAIN after the visual treatment you want to finish, then compare the stack with grain temporarily turned off.
Does Grain Rate change the video's frame rate?
GRAIN RATE controls how often the texture changes. The export's frame-rate choice controls the delivered video. It does not slow the person's movement or turn the source into slow motion. A 24 fps grain setting can sit over a 30 fps export.
Check the rendered file when choosing a rate. Small grain and compression can soften into a smooth surface; very coarse grain can compete with the subject. Watch it at the size people will actually see, then pause at full size to inspect faces and fine lettering.
Why does my film-grain effect look wrong?
Start by separating texture from other finishing controls. SCANLINES can make the picture read as a television, DUST adds individual specks, and FRAME can hide the top and bottom behind bars. Keep those out of the first comparison, then add them deliberately if the composition needs them.
| Symptom | What to change |
|---|---|
| The whole face looks dirty | Reduce GRAIN before changing several tonal weights |
| The texture is too coarse | Lower GRAIN SIZE and check the export at its delivered size |
| The black background crawls | Lower SHADOWS |
| Bright areas look gritty | Lower HIGHLIGHTS |
| Horizontal lines appear | Set SCANLINES to 0 |
| White or dark specks flash | Set DUST to 0 |
| The image dims unevenly | Set FLICKER to 0 |
| Black bars hide the composition | Set FRAME to FULL |
| The texture looks stuck | Check GRAIN RATE and make sure you chose FILM STOCK rather than FROZEN paper grain |
Export a short test before rendering a full song. Inspect the downloaded file for readable eyes, stable lettering and clean dark areas, then watch the moving image without zooming in. Your plan controls export resolution, watermark and allowance; see plans and export limits.